Tasting Dagger 2 on Android.

Dependency Injection (DI) is probably one of the most fundamental functionalities every software project should have. In this ocassion, we will see how Dagger 2 can help us and what is the logic behind its usage, in order to achieve objects injection in Android (OOP).
“Software Engineering and Architecture is about evolution.”
- Introduction
- Why dependency injection?
- What is JSR-330?
- Dagger 1
- Dagger 2
- Diving deeper
- Shut up and show me the code!
- Our example
- Putting everything together
- Dagger 2 code generation
- Testing
- Wrapping up
- Source code:
- Further reading:
- References:
Introduction
Hey! Finally I decided that was a good time to get back to the blog and share what I have been dealing with for the last weeks. In this occasion I would like to talk a bit about my experience with Dagger 2, but first I think that really worth a quick explanation about why I believe that dependency injection is important, and why we should definitely use it in our android applications.
By the way, I assume that you have have a basic knowledge about dependency injection in general, and tools like Dagger/Guice, otherwise I would suggest you to check some of the very good tutorials out there.
Let’s get our hands dirty then!
Why dependency injection?
The first (and indeed most important) thing we should know about it, is that it has been there for a long time and it uses Inversion of Control principle, which basically states that the flow of your application depends on the object graph that is built up during program execution, and such a dynamic flow is made possible by object interactions being defined through abstractions. This run-time binding is achieved by mechanisms such as dependency injection or a service locator.
With that being said, we can get to the conclusion that dependency injection brings us important benefits:
- Since dependencies can be injected and configured externally, we can reuse those components.
- When injecting abstractions as collaborators, we can just change the implementation of any object without having to make a lot of changes in our codebase, since that object instantiation resides in one place isolated and decoupled.
- Dependencies can be injected into a component: it is possible to inject mock implementations of these dependencies which makes testing easier.
One thing that we will see, is that we can manage the scope of our instances created, which is something really cool and from my point of view, any object or collaborator in your app should not know anything about instances creation and lifecycle and this should be managed by our dependency injection framework.
What is JSR-330?
Basically dependency injection for Java defines a standard set of annotations (and one interface) for use on injectable classes in order to maximize reusability, testability and maintainability of java code.
Both Dagger 1 and 2 (also Guice) are based on this standard which brings up consistency and an standard way to do dependency injection.
Dagger 1
I will be very quick here because this version is out of the purpose of this article. Anyway, Dagger 1 has a lot to offer and I would say that at the time of writing, is the most popular dependency injector used on Android.
It has been created by Square inspired by Guice.
Its fundamentals are:
- Multiple injection points: dependencies, being injected.
- Multiple bindings: dependencies, being provided.
- Multiple modules: a collection of bindings that implement a feature.
- Multiple object graphs: a collection of modules that implement a scope.
Dagger 1 uses compile time to figure out bindings but also uses reflection, and although it is not used to instantiate objects, it is used for graph composition.
All this process happens at runtime, where Dagger tries to figure out how everything fits together, so there is a price to pay: inefficiency sometimes and difficulties when debugging.
Dagger 2
Dagger 2 is a fork from Dagger 1 under heavy development by Google, currently version 2.0. It was inspired by the AutoValue project (useful if you are tired of writing equals and hashcode methods everywhere).
From the beginning, the basic idea behind Dagger 2, was to make problems solvable by using code generation, hand written code, as if we were writing all the code that creates and provides our dependencies ourselves.
If we compare this version with its predecessor, both are quite similar in many aspects but there are also important differences that worth mentioning:
- No reflection at all: graph validation, configurations and preconditions at compile time.
- Easy debugging and fully traceable: entirely concrete call stack for provision and creation.
- More performance: according to google they gained 13% of processor performance.
- Code obfuscation: it uses method dispatch, like hand written code.
Of course all this cool features come with a price, which makes it less flexible: for instance, there is no dynamism due to the lack of reflection.
Diving deeper
To understand Dagger 2 it is important (and probably a bit hard in the beginning) to know about the fundamentals of dependency injection and the concepts of each one of these guys (do not worry if you do not understand them yet, we will see examples):
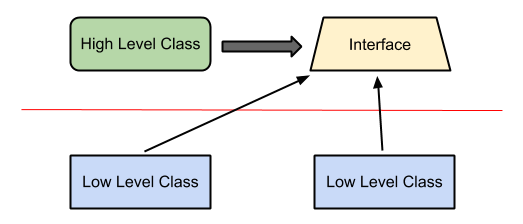
@Inject:Basically with this annotation we request dependencies. In other words, you use it to tell Dagger that the annotated class or field wants to participate in dependency injection. Thus, Dagger will construct instances of this annotated classes and satisfy their dependencies.@Module:Modules are classes whose methods provide dependencies, so we define a class and annotate it with@Module, thus, Dagger will know where to find the dependencies in order to satisfy them when constructing class instances. One important feature of modules is that they have been designed to be partitioned and composed together (for instance we will see that in our apps we can have multiple composed modules).@Provide:Inside modules we define methods containing this annotation which tells Dagger how we want to construct and provide those mentioned dependencies.@Component:Components basically are injectors, let’s say a bridge between@Injectand@Module, which its main responsibility is to put both together. They just give you instances of all the types you defined, for example, we must annotate an interface with @Component and list all the @Modules that will compose that component, and if any of them is missing, we get errors at compile time. All the components are aware of the scope of dependencies it provides through its modules.@Scope:Scopes are very useful and Dagger 2 has has a more concrete way to do scoping through custom annotations. We will see an example later, but this is a very powerful feature, because as pointed out earlier, there is no need that every object knows about how to manage its own instances. An scope example would be a class with a custom @PerActivity annotation, so this object will live as long as our Activity is alive. In other words, we can define the granularity of your scopes (@PerFragment,@PerUser, etc).@Qualifier:We use this annotation when the type of class is insufficient to identify a dependency. For example in the case of Android, many times we need different types of context, so we might define a qualifier annotation@ForApplicationand@ForActivity, thus when injecting a context we can use those qualifiers to tell Dagger which type of context we want to be provided.
Shut up and show me the code!
I guess it is too much theory for now, so let’s see Dagger 2 in action, although it is a good idea to first set it up by adding the dependencies in our build.gradle file:
apply plugin: 'com.neenbedankt.android-apt'

buildscript {
  repositories {
    jcenter()
  }
  dependencies {
    classpath 'com.neenbedankt.gradle.plugins:android-apt:1.4'
  }
}

android {
  ...
}

dependencies {
  apt 'com.google.dagger:dagger-compiler:2.0'
  compile 'com.google.dagger:dagger:2.0'
  provided 'javax.annotation:jsr250-api:1.0'

  ...
}
As you can see we are adding javax annotations, compiler, the runtime library and the apt plugin, which is necessary, otherwise the dagger annotation processor might not work properly: I encountered problems on Android Studio.
Our example
A few months ago I wrote an article: “Architecting Android…The clean way?” on how to implement Robert C. Martin’s Clean Architecture on Android, which I strongly recommend to read so you get a better understanding of what we are gonna do here.
Back then, I faced a problem when constructing and providing dependencies of most of the objects involved in my solution, which looked something like this (check out the comments):
@Override void initializePresenter() {
  // All this dependency initialization could have been avoided by
  // using a dependency injection framework. But in this case this
  // is used this way for LEARNING EXAMPLE PURPOSE.
  ThreadExecutor threadExecutor = JobExecutor.getInstance();
  PostExecutionThread postExecutionThread = UIThread.getInstance();

  JsonSerializer userCacheSerializer = new JsonSerializer();
  UserCache userCache = UserCacheImpl.getInstance(getActivity(),
      userCacheSerializer, FileManager.getInstance(), threadExecutor);
  UserDataStoreFactory userDataStoreFactory =
      new UserDataStoreFactory(this.getContext(), userCache);
  UserEntityDataMapper userEntityDataMapper = new UserEntityDataMapper();
  UserRepository userRepository = UserDataRepository
      .getInstance(userDataStoreFactory, userEntityDataMapper);

  GetUserDetailsUseCase getUserDetailsUseCase =
      new GetUserDetailsUseCaseImpl(userRepository, threadExecutor,
            postExecutionThread);
  UserModelDataMapper userModelDataMapper = new UserModelDataMapper();

  this.userDetailsPresenter =
      new UserDetailsPresenter(this, getUserDetailsUseCase,
            userModelDataMapper);
}
As you can see, the way to address this problem is to use a dependency injection framework.
We basically get rid of that boilerplate code (which is unreadable and understandable): this class must not know anything about object creation and dependency provision.
So how do we do it? Of course we use Dagger 2 features… Let me picture the structure of my dependency injection graph:
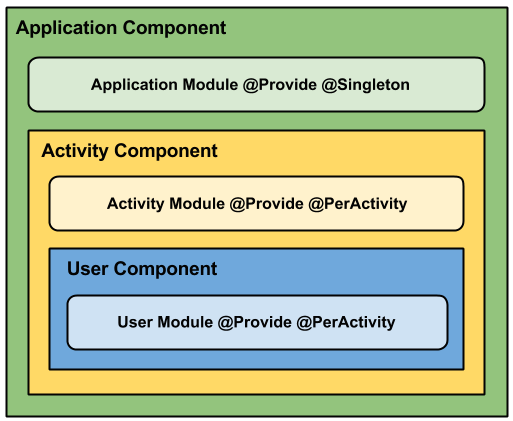
Let’s break this graphic down and explain its parts plus some code.
Application Component: A component whose lifetime is the life of the application. It injects both AndroidApplication and BaseActivity classes.
@Singleton // One-per-application or unscoped bindings.
@Component(modules = ApplicationModule.class)
public interface ApplicationComponent {
  void inject(BaseActivity baseActivity);

  //Exposed to sub-graphs.
  Context context();
  ThreadExecutor threadExecutor();
  PostExecutionThread postExecutionThread();
  UserRepository userRepository();
}
As you can see, I use the @Singleton annotation for this component which constraints it to one-per-application. You might be wondering why I’m exposing the Context and the rest of the classes.
This is actually an important property of how components work in Dagger: they do not expose types from their modules unless you explicitly make them available.
In this case in particular I just exposed those elements to subgraphs and if you try to remove any of them, a compilation error will be triggered.
Application Module: This module provides objects which will live during the application lifecycle, that is the reason why all of @Provide methods use a @Singleton scope.
@Module
public class ApplicationModule {
  private final AndroidApplication application;

  public ApplicationModule(AndroidApplication application) {
    this.application = application;
  }

  @Provides @Singleton Context provideApplicationContext() {
    return this.application;
  }

  @Provides @Singleton Navigator provideNavigator() {
    return new Navigator();
  }

  @Provides @Singleton ThreadExecutor provideThreadExecutor(
      JobExecutor jobExecutor) {
    return jobExecutor;
  }

  @Provides @Singleton PostExecutionThread providePostExecutionThread(
      UIThread uiThread) {
    return uiThread;
  }

  @Provides @Singleton UserCache provideUserCache(UserCacheImpl userCache) {
    return userCache;
  }

  @Provides @Singleton UserRepository provideUserRepository(
      UserDataRepository userDataRepository) {
    return userDataRepository;
  }
}
Activity Component: A component which will live during the lifetime of an activity.
@PerActivity
@Component(dependencies = ApplicationComponent.class,
           modules = ActivityModule.class)
public interface ActivityComponent {
  //Exposed to sub-graphs.
  Activity activity();
}
The @PerActivity is a custom scoping annotation to permit objects whose lifetime should conform to the life of the activity to be memorized in the correct component.
I really encourage to do this as a good practice, since we get these advantages:
- The ability to inject objects where and activity is required to be constructed.
- The use of singletons on a per-activity basis.
- The global object graph is kept clear of things that can be used only in activities.
You can see the code below:
@Scope
@Retention(RUNTIME)
public @interface PerActivity {}
Activity Module: This module exposes the activity to dependents in the graph. The reason behind this is basically to use the activity context in a fragment, for example.
@Module
public class ActivityModule {
  private final Activity activity;

  public ActivityModule(Activity activity) {
    this.activity = activity;
  }

  @Provides @PerActivity Activity activity() {
    return this.activity;
  }
}
User Component: A scoped @PerActivity component that extends ActiviyComponent.
Basically I use it in order to injects user specific fragments. Since ActivityModule exposes the activity to the graph (as mentioned earlier), whenever an activity context is needed to satisfy a dependency, Dagger will get it from there and inject it: there is no need to re define it in sub modules.
@PerActivity
@Component(dependencies = ApplicationComponent.class,
           modules = {ActivityModule.class, UserModule.class})
public interface UserComponent extends ActivityComponent {
  void inject(UserListFragment userListFragment);
  void inject(UserDetailsFragment userDetailsFragment);
}
User Module: A module that provides user related collaborators. Based on the example, it will provide user use cases basically.
@Module
public class UserModule {
  @Provides @PerActivity GetUserListUseCase provideGetUserListUseCase(
      GetUserListUseCaseImpl getUserListUseCase) {
    return getUserListUseCase;
  }

  @Provides @PerActivity GetUserDetailsUseCase provideGetUserDetailsUseCase(
      GetUserDetailsUseCaseImpl getUserDetailsUseCase) {
    return getUserDetailsUseCase;
  }
}
Putting everything together
Now we have our dependency injection graph implementation, how do we inject dependencies?
Something we need to know is that Dagger give us a bunch of options to inject dependencies:
- Constructor injection: by annotating the constructor of our class with
@Inject. - Field injection: by annotating a (non private) field of our class with
@Inject. - Method injection: by annotating a method with
@Inject.
This is also the order used by Dagger when binding dependencies and it is important because it might happen that you have some strange behavior or even NullPointerExceptions, which means that your dependencies might not have been initialized at the moment of the object creation.
This is common on Android when using field injection in Activities or Fragments, since we do not have access to their constructors.
Getting back to our example, let’s see how we can inject a member to our BaseActivity.
In this case we do it with a class called Navigator which is responsible for managing the navigation flow in our app:
public abstract class BaseActivity extends Activity {

  @Inject Navigator navigator;

  @Override
  protected void onCreate(Bundle savedInstanceState) {
    super.onCreate(savedInstanceState);
    this.getApplicationComponent().inject(this);
  }

  protected ApplicationComponent getApplicationComponent() {
    return ((AndroidApplication)getApplication())
              .getApplicationComponent();
  }

  protected ActivityModule getActivityModule() {
    return new ActivityModule(this);
  }
}
Since Navigator is bound by field injection it is mandatory to be provided explicitly in our ApplicationModule using @Provide annotation.
Finally we initialize our component and call the inject() method in order to inject our members. We do this in the onCreate() method of our Activity by calling getApplicationComponent().
This method has been added here for reusability and its main purpose is to retrieve the ApplicationComponent which was initialized in the Application object.a
Let’s do the same with a presenter in a Fragment.
In this case the approach is a bit different since we are using a per-activity scoped component. So our UserComponent which will inject UserDetailsFragment will reside in our UserDetailsActivity:
private UserComponent userComponent;
We have to initialize it this way in the onCreate() method of the activity:
private void initializeInjector() {
  this.userComponent = DaggerUserComponent.builder()
      .applicationComponent(getApplicationComponent())
      .activityModule(getActivityModule())
      .build();
}
As you can see when Dagger processes our annotations, creates implementations of our components and rename them adding a “Dagger” prefix.
Since this is a composed component, when constructing it, we must pass in all its dependencies (both components and modules).
Now that our component is ready, we just make it accesible in order to satisfy the fragment dependencies:
@Override public UserComponent getComponent() {
  return userComponent;
}
We bind UserDetailsFragment dependencies by getting the created component and calling the inject() method passing the Fragment as a parameter:
@Override public void onActivityCreated(Bundle savedInstanceState) {
  super.onActivityCreated(savedInstanceState);
  this.getComponent.inject(this);
}
For the complete example, check the repository on github. There is also some refactor happening and I can tell you that one of the main ideas (taken from the official examples) is to have an interface as a contract which will be implemented by every class that has a component.
Something like this:
public interface HasComponent<C> {
  C getComponent();
}
Thus, the client (for example a Fragment) can get the component (from the Activity) and use it:
@SuppressWarnings("unchecked")
protected <C> C getComponent(Class<C> componentType) {
  return componentType.cast(((HasComponent<C>)getActivity())
            .getComponent());
}
The use of generics here makes mandatory to do the casting but at least is gonna fail fast whether the client cannot get a component to use.
Just ping me if you have any thoughts/ideas on how to solve this in a better way.
Dagger 2 code generation
After having a taste of Dagger’s main features, let’s see how it does its job under the hood.
To illustrate this, we are gonna take again the Navigator class and see how it is created and injected.
First let’s have a look at our DaggerApplicationComponent which is an implementation of our ApplicationComponent:
@Generated("dagger.internal.codegen.ComponentProcessor")
public final class DaggerApplicationComponent implements ApplicationComponent {
  private Provider<Navigator> provideNavigatorProvider;
  private MembersInjector<BaseActivity> baseActivityMembersInjector;

  private DaggerApplicationComponent(Builder builder) {
    assert builder != null;
    initialize(builder);
  }

  public static Builder builder() {
    return new Builder();
  }

  private void initialize(final Builder builder) {
    this.provideNavigatorProvider = ScopedProvider.create(
      ApplicationModule_ProvideNavigatorFactory.create(builder.applicationModule));
    this.baseActivityMembersInjector = BaseActivity_MembersInjector
      .create((MembersInjector) MembersInjectors.noOp(), provideNavigatorProvider);
  }

  @Override
  public void inject(BaseActivity baseActivity) {
    baseActivityMembersInjector.injectMembers(baseActivity);
  }

  public static final class Builder {
    private ApplicationModule applicationModule;

    private Builder() {
    }

    public ApplicationComponent build() {
      if (applicationModule == null) {
        throw new IllegalStateException("applicationModule must be set");
      }
      return new DaggerApplicationComponent(this);
    }

    public Builder applicationModule(ApplicationModule applicationModule) {
      if (applicationModule == null) {
        throw new NullPointerException("applicationModule");
      }
      this.applicationModule = applicationModule;
      return this;
    }
  }
}
Two important things:
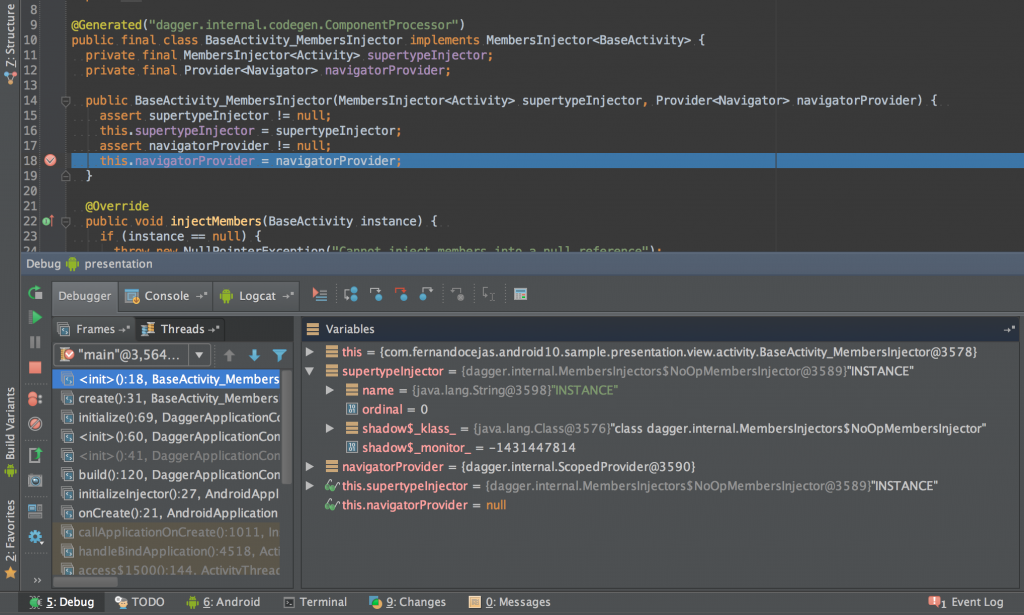
The first one: is that since we are gonna inject our activity, we have a members injector (which Dagger translates to BaseActivity_MembersInjector):
@Generated("dagger.internal.codegen.ComponentProcessor")
public final class BaseActivity_MembersInjector
                      implements MembersInjector<BaseActivity> {
  private final MembersInjector<Activity> supertypeInjector;
  private final Provider<Navigator> navigatorProvider;

  public BaseActivity_MembersInjector(
      MembersInjector<Activity> supertypeInjector,
      Provider<Navigator> navigatorProvider) {

    assert supertypeInjector != null;
    this.supertypeInjector = supertypeInjector;
    assert navigatorProvider != null;
    this.navigatorProvider = navigatorProvider;
  }

  @Override
  public void injectMembers(BaseActivity instance) {
    if (instance == null) {
      throw new NullPointerException("Cannot inject
        members into a null reference");
    }
    supertypeInjector.injectMembers(instance);
    instance.navigator = navigatorProvider.get();
  }

  public static MembersInjector<BaseActivity> create(
      MembersInjector<Activity> supertypeInjector,
      Provider<Navigator> navigatorProvider) {

      return new BaseActivity_MembersInjector(supertypeInjector,
                    navigatorProvider);
  }
}
Basically, this guy contains providers for all the injectable members of our Activity so when we call inject() will take the accessible fields and bind the dependencies.
The second one: Regarding our DaggerApplicationComponent, is that we have a Provider<Navigator> which is no more than interface which provides instances of our class and it is constructed by a ScopedProvider (in the initialize() method) which will memorize the scope of the created class.
Dagger also generated ApplicationModule_ProvideNavigatorFactory which is a Factory for our Navigator which is passed as a parameter to the mentioned ScopedProvider in order to get scoped instances of our class.
@Generated("dagger.internal.codegen.ComponentProcessor")
public final class ApplicationModule_ProvideNavigatorFactory
implements Factory<Navigator> {
private final ApplicationModule module;
public ApplicationModule_ProvideNavigatorFactory
(ApplicationModule module) {
assert module != null;
this.module = module;
}
@Override
public Navigator get() {
Navigator provided = module.provideNavigator();
if (provided == null) {
throw new NullPointerException("Cannot return null from
a non-@Nullable @Provides method");
}
return provided;
}
public static Factory<Navigator> create(
ApplicationModule module) {
return new ApplicationModule_ProvideNavigatorFactory(module);
}
}
This class is actually very simple, it delegates to our ApplicationModule (which contains our @Provide method()) the creation of our Navigator class.
In conclusion, this really looks like hand-written code and it is very easy to understand which makes it easy to debug.
There is still much to explore here and a good idea is start debugging and see how Dagger deal with dependency binding.
Testing
Honestly not too much to say here: for unit tests, I do not think is necessary to create any injector so I do not use Dagger, and by injecting mock collaborators manually works fine till now but when it comes to end-to-end integration tests, Dagger could make more sense: you can replace modules with others that provide mocks.
I will appreciate any experience here to add it as part of the article.
Wrapping up
So far we have had a taste on what Dagger is capable of doing, but still there is a long way ahead of us, so I strongly recommend to read the documentation, watch videos and have a look at the examples.
This was actually a small sample for learning purpose and I hope you have found it useful.
Remember that any feedback is always welcome.
Source code:
- Example: Android Clean Architecture.
Further reading:
- Architecting Android..The Evolution.
- Architecting Android..The Clean Way?.
- The Mayans Lost Guide to RxJava on Android.
- It is about philosophy: Culture of a good programmer.