Architecting Android...The evolution.

Architecture is about evolution. Also on Android this is a constant work in progress, so in this post we will walk together through the evolution of my implementation of Clean Architecture on Android from previous posts.
“Evolution stands for a gradual process in which something changes into a different and usually more complex or better form.”
- Introduction
- Architecture evolution
- Reactive approach: RxJava
- Dependency Injection: Dagger 2
- Lambda expressions: Retrolambda
- Testing approach
- Package organization
- Extra ball: organizing your build logic
- Wrapping up
- Source code
- Further reading
- References
Introduction
Hey there! After a while (and a lot of feedback received) I decided it was a good time to get back to this topic and give you another taste of what I consider a good approach when it comes to architecting modern mobile applications (android in this case).
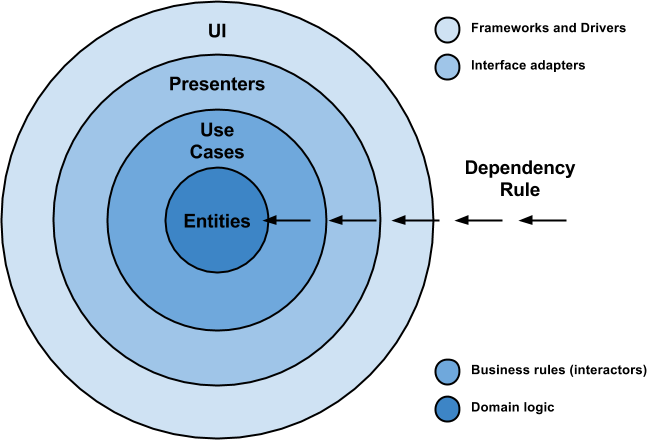
Before getting started, I assume that you already read my previous post about Architecting Android…The clean way?. If not, this is a good opportunity to get in touch with it in order to have a better understanding of the story I’m going to tell you right here:
Architecture evolution
Evolution stands for a gradual process in which something changes into a different and usually more complex or better form.
With that being said, software evolves and changes over the time and indeed architecture. Actually a good software design must help us grow and extend our solution by keeping it healthy without having to rewrite everything (although there are cases where this approach is better, but that is a topic for another article, so let’s focus in what I pointed out earlier, trust me).
In this article, I am going to walk you through key points I consider necessary and important, to keep the sanity of our android codebase.
Keep in mind this picture and let’s get started.
Reactive approach: RxJava
I’m not going to talk about the benefits of RxJava here (I assume you already had a taste of it), since there are a lot of articles and badasses of this technology, who are doing an excellent job out there.
However, I will point out what makes it interesting in regards of android applications development, and how it has helped me evolve my first approach of clean architecture.
First, I opted for a reactive pattern by converting use cases (called interactors in the clean architecture naming convention) to return Observables<T> which means all the lower layers will follow the chain and return Observables<T> too.
public abstract class UseCase {

  private final ThreadExecutor threadExecutor;
  private final PostExecutionThread postExecutionThread;

  private Subscription subscription = Subscriptions.empty();

  protected UseCase(ThreadExecutor threadExecutor,
      PostExecutionThread postExecutionThread) {
    this.threadExecutor = threadExecutor;
    this.postExecutionThread = postExecutionThread;
  }

  protected abstract Observable buildUseCaseObservable();

  public void execute(Subscriber UseCaseSubscriber) {
    this.subscription = this.buildUseCaseObservable()
        .subscribeOn(Schedulers.from(threadExecutor))
        .observeOn(postExecutionThread.getScheduler())
        .subscribe(UseCaseSubscriber);
  }

  public void unsubscribe() {
    if (!subscription.isUnsubscribed()) {
      subscription.unsubscribe();
    }
  }
}
As you can see here, all use cases inherit from this abstract class and implement the abstract method buildUseCaseObservable() which will setup an Observable<T> that is going to do the hard job and return the needed data.
Something to highlight is the fact that on execute() method, we make sure our Observable<T> executes itself in a separate thread, thus, minimizing how much we block the android main thread. The result is push back on the Android main thread through the android main thread scheduler.
So far, we have our Observable<T> up and running, but, as you know, someone has to observe the data sequence emitted by it.
To achieve this, I evolved Presenters (part of MVP in the presentation layer) into Subscribers which would “react” to these emitted items by use cases in order to update the user interface.
Here is how the Subscriber looks like:
private final class UserListSubscriber extends DefaultSubscriber<List<User>> {

  @Override public void onCompleted() {
    UserListPresenter.this.hideViewLoading();
  }

  @Override public void onError(Throwable e) {
    UserListPresenter.this.hideViewLoading();
    UserListPresenter.this.showErrorMessage(new DefaultErrorBundle((Exception) e));
    UserListPresenter.this.showViewRetry();
  }

  @Override public void onNext(List<User> users) {
    UserListPresenter.this.showUsersCollectionInView(users);
  }
}
Every subscriber is an inner class inside each presenter and implements a DefaultSubscriber<T> created basically for default error handling.
After putting all pieces in place, you can get the whole idea by having a look at the following picture:

Let’s enumerate a bunch of benefits we get out of this RxJava based approach:
- Decoupling between Observables and Subscribers: makes maintainability and testing easier.
- Simplified asynchronous tasks: java threads and futures are complex to manipulate and synchronize if more than one single level of asynchronous execution is required, so by using schedulers we can jump between background and main thread in an easy way (with no extra effort), especially when we need to update the UI. We also avoid what we call a “callback hell”, which makes our code unreadable and hard to follow up.
- Data transformation/composition: we can combine multiple
Observables<T>without affecting the client, which makes our solution more scalable. - Error handling: a signal is emitted to the consumer when an error has occurred within any
Observable<T>.
From my point of view there is one drawback, and indeed a price to pay, which has to do with the learning curve for developers who are not familiar with the concept. However, you get very valuable stuff out of it. Reactive for the win!
Dependency Injection: Dagger 2
I’m not going to talk much of dependency injection cause I have already written a whole article, which I strongly recommend you to read, so we can stay on the same page here.
With that being said, it is worth mentioning, that by implementing a dependency injection framework like Dagger 2, we gain:
- Components reuse, since dependencies can be injected and configured externally.
- When injecting abstractions as collaborators, we can just change the implementation of any object without having to make a lot of changes in our codebase, since that object instantiation resides in one place isolated and decoupled.
- Dependencies can be injected into a component: it is possible to inject mock implementations of these dependencies which makes testing easier.
Lambda expressions: Retrolambda
No one will complain about making use of Java 8 lambdas in our code, and even more when they simplify it and get rid of a lot of boilerplate, as you can see in this piece of code:
private final Action1<UserEntity> saveToCacheAction =
    userEntity -> {
      if (userEntity != null) {
        CloudUserDataStore.this.userCache.put(userEntity);
      }
    };
However, I have mixed feelings here and will explain why. It turns out that at @SoundCloud we had a discussion around Retrolambda, mainly whether or not to use it, and the outcome was:
- Pros:
- Lambdas and method references.
- Try with resources.
- Dev karma.
- Cons:
- Accidental use of Java 8 APIs.
- 3rd part lib, quite intrusive.
- 3rd part gradle plugin to make it work with Android.
Finally we decided it was not something that would solve any problems for us: your code looks better and more readable but it was something we could live without, since nowadays all the most powerful IDEs contain code folding options which cover this need, at least in an acceptable manner.
Honestly, the main reason why I used it here, was more to play around it and have a taste of lambdas on Android, although I would probably use it again for a spare time project. I will leave the decision up to you. I am just exposing my field of vision here. Of course the author of this library deserves my kudos for such an amazing job.
Testing approach
In terms of testing, not big changes in relation with the first version of the example:
- Presentation layer: UI tests with Espresso 2 and Android Instrumentation.
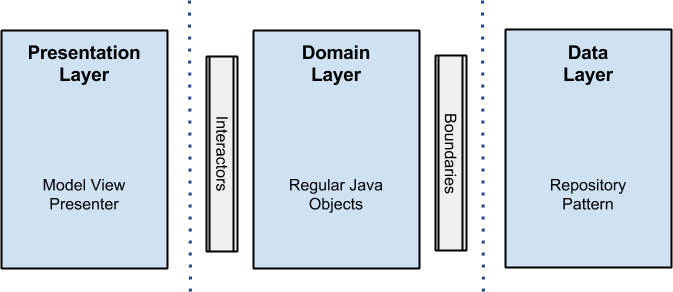
- Domain layer: JUnit + Mockito since it is a regular Java module.
- Data layer: Migrated test battery to use Robolectric 3 + JUnit + Mockito. Tests for this layer used to live in a separate Android Module, since back then (at the moment of the first version of the example), there was no built-in unit test support and setting up a framework like robolectric was complicated and required a serie of hacks to make it work properly. Fortunately that is part of the past and now everything works out of the box so I could relocated them inside the data module, specifically into its default test location:
src/test/javafolder.
Package organization
I consider code/package organization one of the key factors of a good architecture: package structure is the very first thing encountered by a programmer when browsing source code. Everything flows from it. Everything depends on it.
We can distinguish between 2 paths you can take to divide up your application into packages:
- Package by layer: Each package contains items that usually are not closely related to each other. This results in packages with low cohesion and low modularity, with high coupling between packages. As a result, editing a feature involves editing files across different packages. In addition, deleting a feature can almost never be performed in a single operation.
- Package by feature: It uses packages to reflect the feature set. It tries to place all items related to a single feature (and only that feature) into a single package. This results in packages with high cohesion and high modularity, and with minimal coupling between packages. Items that work closely together are placed next to each other. They are not spread out all over the application.
My recommendation is to go with packages by features, which bring these main benefits:
- Higher Modularity
- Easier Code Navigation
- Minimizes Scope
It is also interesting to add that if you are working with feature teams (as we do at @SoundCloud), code ownership will be easier to organize and more modularized, which is a win in a growing organization where many developers are working on the same codebase.
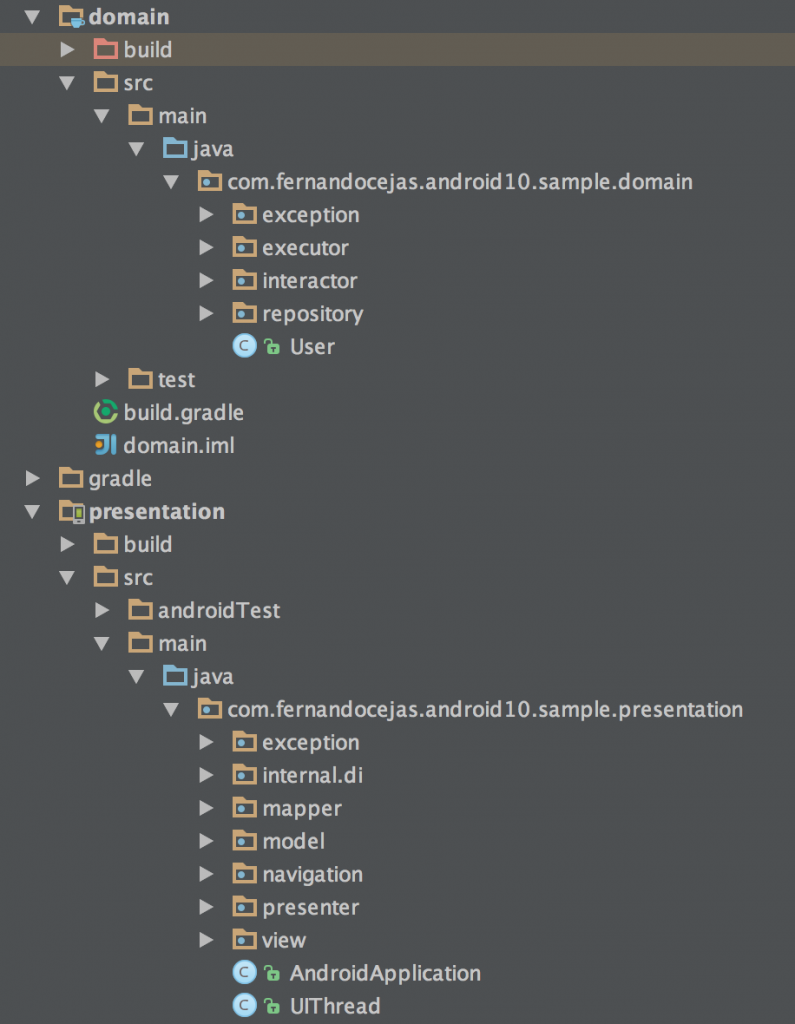
As you can see, my approach looks like packages organized by layer: I might have gotten wrong here (and group everything under ‘users’ for example) but I will forgive myself in this case, because this sample is for learning purpose and what I wanted to expose, were the main concepts of the clean architecture approach. DO AS I SAY, NOT AS I DO :).
Extra ball: organizing your build logic
We all know that you build a house from the foundations up. The same happens with software development, and here I want to remark that, from my perspective, the build system (and its organization) is an important piece of a software architecture.
On Android, we use gradle, which is a platform agnostic build system and indeed, very powerful.
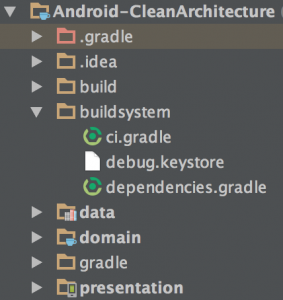
The idea here is to go through a bunch of tips and tricks that can simplify your life when it comes to how organize the way you build your application:
- Group stuff by functionality in separate gradle build files.
def ciServer = 'TRAVIS'
def executingOnCI = "true".equals(System.getenv(ciServer))

// Since for CI we always do full clean builds, we don't want to pre-dex
// See http://tools.android.com/tech-docs/new-build-system/tips
subprojects {
  project.plugins.whenPluginAdded { plugin ->
    if ('com.android.build.gradle.AppPlugin'.equals(plugin.class.name) ||
        'com.android.build.gradle.LibraryPlugin'.equals(plugin.class.name)) {
      project.android.dexOptions.preDexLibraries = !executingOnCI
    }
  }
}
apply from: 'buildsystem/ci.gradle'
apply from: 'buildsystem/dependencies.gradle'

buildscript {
  repositories {
    jcenter()
  }
  dependencies {
    classpath 'com.android.tools.build:gradle:1.2.3'
    classpath 'com.neenbedankt.gradle.plugins:android-apt:1.4'
  }
}

allprojects {
  ext {
	...
  }
}
...
Thus, you can use apply from: buildsystem/ci.gradle to plug that configuration to any gradle build file. Do not put everything on only one build.gradle file otherwise you will start creating a monster. Lesson learned.
- Create maps of dependencies.
...

ext {
  //Libraries
  daggerVersion = '2.0'
  butterKnifeVersion = '7.0.1'
  recyclerViewVersion = '21.0.3'
  rxJavaVersion = '1.0.12'

  //Testing
  robolectricVersion = '3.0'
  jUnitVersion = '4.12'
  assertJVersion = '1.7.1'
  mockitoVersion = '1.9.5'
  dexmakerVersion = '1.0'
  espressoVersion = '2.0'
  testingSupportLibVersion = '0.1'

  ...

  domainDependencies = [
      daggerCompiler:     "com.google.dagger:dagger-compiler:${daggerVersion}",
      dagger:             "com.google.dagger:dagger:${daggerVersion}",
      javaxAnnotation:    "org.glassfish:javax.annotation:${javaxAnnotationVersion}",
      rxJava:             "io.reactivex:rxjava:${rxJavaVersion}",
  ]

  domainTestDependencies = [
      junit:              "junit:junit:${jUnitVersion}",
      mockito:            "org.mockito:mockito-core:${mockitoVersion}",
  ]

  ...

  dataTestDependencies = [
      junit:              "junit:junit:${jUnitVersion}",
      assertj:            "org.assertj:assertj-core:${assertJVersion}",
      mockito:            "org.mockito:mockito-core:${mockitoVersion}",
      robolectric:        "org.robolectric:robolectric:${robolectricVersion}",
  ]
}
apply plugin: 'java'

sourceCompatibility = 1.7
targetCompatibility = 1.7

...

dependencies {
  def domainDependencies = rootProject.ext.domainDependencies
  def domainTestDependencies = rootProject.ext.domainTestDependencies

  provided domainDependencies.daggerCompiler
  provided domainDependencies.javaxAnnotation

  compile domainDependencies.dagger
  compile domainDependencies.rxJava

  testCompile domainTestDependencies.junit
  testCompile domainTestDependencies.mockito
}
This is very useful if you want to reuse the same artifact version across different modules in your project, or maybe the other way around, where you have to apply different dependency versions to different modules.
Another plus one, is that you also control the dependencies in one place and, for instance, bumping an artifact version is pretty straightforward.
Wrapping up
That is pretty much I have for now, and as a conclusion, keep in mind there are no silver bullets. However, a good software architecture will help us keep our code clean and healthy, as well as scalable and easy to maintain.
There is a few more things I would like to point out and they have to do with attitudes you should take when facing a software problem:
- Respect SOLID principles.
- Do not over think (do not do over engineering).
- Be pragmatic.
- Minimize framework (android) dependencies in your project as much as you can.
Source code
Further reading
- Architecting Android..Reloaded.
- Architecting Android..the clean way.
- Tasting Dagger 2 on Android.
- The Mayans Lost Guide to RxJava on Android.
- It is about philosophy: Culture of a good programmer.