Android: Dagger 1 and 2 living together...

Migrating from one Dependency Injection Framework to another is not an easy task. Here, I present an approach to smooth the transition from Dagger 1 to Dagger 2 in a gradual way. Just know that we can have both versions of Dagger working together in Android.
“Remember, code is your house, and you have to live in it.”
- Introduction
- Why?
- Solving the puzzle
- Putting all pieces together
- Alternative setup
- Migration process
- Conclusion
- References
Introduction
In this article I will give a quick explanation on how we can have Dagger 1 and 2 siting and working together. Let me just clear this up: I will not talk about the benefits of neither dependency injection nor Dagger, since I have done it in the past.
Also, the title of this post may sound a little bit misleading up front, but the idea is that hopefully by the end of it, you will understand its reason.
Why?
This is the first question that comes to my mind at the moment of this writing. Well… let me give you some more context here: you have a big android/java/kotlin codebase using Dagger 1 and want to reorganize your dependency injection approach and migrate to Dagger 2.
You have a couple of options:
- Do it in one shot, for instance, send a big PR (the team is not going to be very happy when reviewing it and might lead to a lot of conflicts with existing development branches and features).
- Do it gradually in small pieces (divide and conquer: always break down a big problem into smaller ones, specially in big codebases with many people contributing to it.).

Just for the record, the picture reflects our SoundCloud Listeners Android app main module which has 240k lines of code approximately (without counting internally developed libraries) and at least 20 contributors to the main codebase.
Solving the puzzle
When trying to use both Dagger versions together, you might run into different situations like classpath clashes and conflicts or transitive dependencies issues. So, in order to avoid them, we have to somehow relocate Dagger 2 packages: this sounds scary but do not give up and continue reading, I promise there is light at the end of the tunnel.
With that being said, we are going to use a gradle plugin called “Shadow” created by John Engelman.
Basically the idea is to use the shadow functionality to achieve our goal, as it is described in the plugin official documentation:
Putting all pieces together
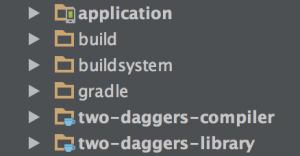
Now we are ready to go: given our android application project, the first step is to add 2 plain java library modules which are going to represent both dagger 2 main library and compiler, as you can see in the following picture:
The idea is simple: we relocate Dagger 2 packages and you can see the magic happening if you sneak into the build.gradle file (shadowJar configuration block) of any of the recently added projects:
shadowJar {
  relocate 'javax.inject.Inject', 'javax.inject.Inject2'
  relocate 'javax.inject.Named', 'javax.inject.Named2'
  relocate 'javax.inject.Provider', 'javax.inject.Provider2'
  relocate 'javax.inject.Qualifier', 'javax.inject.Qualifier2'
  relocate 'javax.inject.Scope', 'javax.inject.Scope2'
  relocate 'javax.inject.Singleton', 'javax.inject.Singleton2'
  relocate 'dagger.Lazy', 'dagger.Lazy2'
  relocate 'dagger.MembersInjector', 'dagger.MembersInjector2'
  relocate 'dagger.Module', 'dagger.Module2'
  relocate 'dagger.Provides', 'dagger.Provides2'
  relocate 'dagger.Provides$Type', 'dagger.Provides$Type2'
  relocate 'dagger.internal', 'dagger.internal2'
  relocate 'dagger.producers', 'dagger.producers2'
}
The script talks by itself here, and now we have our “shadowed” Dagger 2 version ready to be used in our project. Something to keep in mind is that in order to differentiate what is being injected by Dagger 1 and Dagger 2 we will have to use different annotations: this is necessary to avoid clashes.
This will also bring upsides and downsides, but continue reading, we will get back to it later on.
Now it is time to setup our main application dependencies:
dependencies {
  //Dagger 1
  apt 'com.squareup.dagger:dagger-compiler:1.2.2'
  compile 'com.squareup.dagger:dagger:1.2.2'

  //Dagger 2
  apt project(path: ':two-daggers-compiler', transitive: false)
  compile project(path: ':two-daggers-library', transitive: false)

  testCompile 'junit:junit:4.12'
}
Dagger 1 remains the same but we have our new friend coming from compiled “relocated” projects. This should work out of the box.
Alternative setup
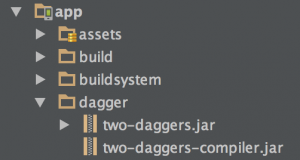
If you do not want to deal with adding 2 extra library components to your project, another way is to use the 2 jars generated by my sample project, place them into /libs or any other folder (or you can also use a Repository Manager like a Nexus Server for example) and setup the dependencies like this:
dependencies {
  ...

  /* Only for Dagger 1 to 2 migration */
  apt files('dagger/two-daggers-compiler.jar')

  /* Only for Dagger 1 to 2 migration */
  compile files('dagger/two-daggers.jar')

  ...
}
Migration process
Before you jump on this journey, here is a little reminder: this is worth if you really have a big codebase and you want to do the migration gradually otherwise always keep it simple and neither do over engineering nor reinvent the wheel.
You have been warned ;).
Now that you decided to hopefully continue, here is an example of a class that can be injected by both Daggers (more code in my sample project on github):
@Singleton
@Singleton2
public class StringGenerator {

  @Inject
  @Inject2
  /**
   * This class can be injected by both dagger 1 and 2
   */
  public StringGenerator() {
    //no op
  }

  public String randomValue() {
    //for learning purpose
    return "34290df320e2k0id";
  }
}
By looking at this class you can tell that it is a Singleton (@Singleton annotation for Dagger 1 and @Singleton2 annotation for Dagger 2). In this case we are not saving any global state (which is good) but there might be cases where you cannot avoid this situation and might run into weird and unexpected behavior due to the fact that you have 2 different instances of the same class being injected, sitting in different dependency graphs.
For instance, this is not longer a Singleton and it is definitely dangerous, so make sure you to take responsibility on this and your tests cover all these cases.
When the migration is over you can remove Dagger 1 and setup Dagger 2 dependency as you would do with any other one. Afterwards, you will have to get rid of all Dagger 1 related annotations plus the ones that Dagger 2 do not understand anymore and replace them:
@Inject2…with…@Inject@Singleton2…with…@Singleton@Component2…with…@Component@Provider2…with…@Provider@Qualifier2…with…@Qualifier@Scope2…with…@Scope@Lazy2…with…@Lazy
Hopefully at this point you will have everything up and running and the job done little by little without much suffering and pain so happy migration!
Conclusion
In this article we have learned and prepared the terrain to make Dagger 1 and 2 live together in a friendly way.
Keep in mind that this solutions does not only apply to Dagger but to any other similar potential migration process you might face in the future.
Finally I hope you find this article useful, and as usual any feedback is very welcome and important. You can find me on twitter: @fernando_cejas.