Learn Linux... Install Arch with Full Disk Encryption.

This post will act pretty much as a guide (a long one), in order to help you INSTALL and UNDERSTAND Arch Linux with full disk encryption. Let’s also walk together through some of the concepts involved in the amazing world of Linux.
“There are 10 kinds of people in the world: those who understand binary numerals, and those who don’t.”
- UPDATES
- Introduction
- Why Arch Linux?
- Assumptions
- Hardware for this Guide
- Preparing the Terrain
- Why Disk Encryption?
- Booting from Arch Linux Live
- First steps
- Disk Partitioning
- Installing The Base System
- Configuring the new installation
- Booting into the System
- One Last Upgrade
- Post Installation MUSTs
- Extras
- Troubleshooting
- Conclusion
- References
UPDATES
- APRIL 2023:
- Some typos and commands fixed. Thanks @juantelez for the feedback.
- NOVEMBER 2022:
- Arch has a built-in installer (it is basically a python script) which can facilitate part of this process. So after booting, we can run it with this command:
$ archinstall --script guided
It is ALSO VERY IMPORTANT to use the Arch Linux Official Installation Guide and follow this guide to understand what is going on, thus, you acquire knowledge and polish/customize your installation. Trust me, the lessons learned here are inmense!!!
Introduction
I’m a Linux fan, and the main reason is because of its open source nature: I have been using it for years and I gotta say a lot has changed since the early days… If you remember re-compiling the kernel in order to install an application, you know what I’m talking about… Fortunately that does not happen anymore(?), so do not freak out, not yet :).
This article will act as a looooong guide, which is goint to help you to install (and understand) Arch Linux with full disk encryption. We will review some of the concepts involved during our process, thus, we have a better picture of what we are doing.
Why Arch Linux?
In the past, I used SuSe, Red Hat, Debian, Ubuntu and Arch, in that order. I gotta say with Arch… was Love at First Sight (also thanks to my friend Oriol).
Here are some of the reasons which motivated me:
- 100% Community based, built from scratch independent of any other Linux distribution.
- The Arch Wiki.
- The Arch Linux Community.
- Perfect Learning Base.
- Community driven Arch User Repository.
- Rolling release with always the latest versions of everything.
- Pacman Package Manager(pacman).
- Full Flexibility and Customization.
- Stability and Reliability.
Assumptions
- You have basic knowledge about using the command line.
- You have already tried out any other linux distro: I will do my best to explain but I might take basic concepts for granted.
- You know how to flash a USB Device with a
.isoimage in order to create a bootable disk for an Operating System.
Hardware for this Guide
I have an Intel based system, in this case a Dell XPS 13 (9310) where we will install everything from scratch. I have also used this guide for installing my Intel NUC too, so most of the content in this article would apply to other hardware. In case there are some specifics I will mention them.
It is important that you check your hardware in the Official Arch Linux Wiki for tips, tricks, troubleshooting and extra specific steps when setting up your linux environment.
Preparing the Terrain
As a first step we need a bootable USB Disk, so in order to create it we need an .iso we can download from here.
Plug your USB Drive Stick and check its location by running lsblk:
NAME            MAJ:MIN RM   SIZE RO TYPE  MOUNTPOINT
sda               8:0    1   7,6G  0 disk
├─sda1            8:1    1   621M  0 part  /run/media/fernando/ARCH_202012
├─sda2            8:2    1    61M  0 part
└─sda3            8:3    1   300K  0 part
In my computer that was /dev/sda, so let’s burn the .iso with the dd tool:
dd bs=4M if=/<path>/archlinux-2020.12.01-x86_64.iso of=/dev/sda status=progress oflag=sync
That is ALL WE NEED at the moment, so let’s get to the next section to start learning :).
Why Disk Encryption?
There is a short answer for this: Security. In a time where (almost) all our information is binary and for instance, our lives, are mostly inside of devices, I personally want to ensure that my sensitive information is hard to get even if my laptop lands on the street, due to it being stolen or lost (hopefully not but never say never…).
So it is time to jump deeper in the core of this article:
The result is going to be a Full Arch Linux installation with Disk Encryption(FDE).
What is Block Device Encryption?
Block device encryption encrypts/decrypts the data transparently as it is written/read from block devices, the underlying block device sees only encrypted data. To mount encrypted block devices we must provide a passphrase to activate the decryption key.
Some systems require the encryption key to be the same as for decryption, and other systems require a specific key for encryption and specific second key for enabling decryption.
Encrypting with dm-crypt/LUKS
LUKS (Linux Unified Key Setup) is a specification for block device encryption (nowadays a standard for Linux). It establishes an on-disk format for the data, as well as a passphrase/key management policy.
LUKS uses the kernel device mapper subsystem via the dm-crypt module. This arrangement provides a low-level mapping that handles encryption and decryption of the device’s data. User-level operations, such as creating and accessing encrypted devices, are accomplished through the use of the cryptsetup utility.
- What LUKS does:
- LUKS encrypts entire block devices
- LUKS is thereby well-suited for protecting the contents of mobile devices such as:
- Removable storage media
- Laptop disk drives
- LUKS is thereby well-suited for protecting the contents of mobile devices such as:
- The underlying contents of the encrypted block device are arbitrary.
- This makes it useful for encrypting swap devices.
- This can also be useful with certain databases that use specially formatted block devices for data storage.
- LUKS uses the existing device mapper kernel subsystem.
- This is the same subsystem used by LVM, so it is well tested.
- LUKS provides passphrase strengthening.
- This protects against dictionary attacks.
- LUKS devices contain multiple key slots.
- This allows users to add backup keys/passphrases.
- LUKS encrypts entire block devices
- What LUKS does not do:
- LUKS is not well-suited for applications requiring many (more than eight) users to have distinct access keys to the same device.
- LUKS is not well-suited for applications requiring file-level encryption.
LVM: Logical Volume Manager
Logical Volume Management utilizes the kernel’s device-mapper feature to provide a system of partitions independent of underlying disk layout. With LVM you abstract your storage and have “virtual partitions”, making extending/shrinking easier (subject to potential filesystem limitations).
Virtual partitions allow addition and removal without worry of whether you have enough contiguous space on a particular disk, getting caught up fdisking a disk in use (and wondering whether the kernel is using the old or new partition table), or, having to move other partitions out of the way.
LVM on LUKS
The straightforward method is to set up LVM on top of the encrypted partition. Technically the LVM is setup inside one big encrypted blockdevice:
+-----------------------------------------------------------------------+ +----------------+
| Logical volume 1      | Logical volume 2      | Logical volume 3      | | Boot partition |
|                       |                       |                       | |                |
| [SWAP]                | /                     | /home                 | | /boot          |
|                       |                       |                       | |                |
| /dev/MyVolGroup/swap  | /dev/MyVolGroup/root  | /dev/MyVolGroup/home  | |                |
|_ _ _ _ _ _ _ _ _ _ _ _|_ _ _ _ _ _ _ _ _ _ _ _|_ _ _ _ _ _ _ _ _ _ _ _| | (may be on     |
|                                                                       | | other device)  |
|                         LUKS encrypted partition                      | |                |
|                           /dev/sda1                                   | | /dev/sdb1      |
+-----------------------------------------------------------------------+ +----------------+
Lesson Summary
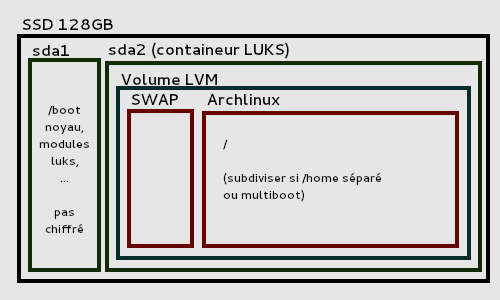 Example of encrypted disk layout using LVM on LUKS
Booting from Arch Linux Live
That is enough theory for now and it is (finally?) time to dip our toe in practical linux water.
As a first step we need to boot our system with our already created Arch Linux Bootable USB Disk.
We will have to disable TPM and SecureBoot, otherwise our USB drive with the Arch Linux
.isoimage will not be recognized. Do not worry, you can enable it later.We also have to Disable RAID and enable AHCI/NVMe (or disable all Operating Mode of the integrated storage device controller). Apparently in many DELL Laptops with Windows, this is only for compatibility and some Intel Features which depend on this functionality under Windows. By the way, RAID mode offers no benefit in this case (on an XPS 13 that only supports a single SSD). Check this official thread for more info.
If you want to have a dual-boot with Windows, disabling RAID will make it unusable but you can follow the next steps to avoid this.
On Windows in order to switch RAID to AHCI (AVOID THIS if you do not want dual-boot Linux-Windows):
- Open the Command Prompt as an administrator. Right Click and
Run as administrator. - Type the following command:
bcdedit/set safeboot minimal. - Reboot the system pressing the F2 key to open the BIOS menu.
- Under System Configuration->SATA Operation, you’ll observe
RAID on. - Switch to
AHCI mode, ignoring the warnings and applying and rebooting. - Repeat step 1 by typing:
bcdedit/deletevalue safeboot. - Reboot Windows and Voila! You have finally switched from RAID to AHCI.
If we have reached this point, that means that we have loaded the Arch Linux Live USB and booted from it. The proof is that we find ourselves at a prompt: root@archiso ~ #. Well done!
First steps
At this point we should be in front of a prompt:
root@archiso ~ #
This is our root prompt and I’ll be shortening that to $ in this post.
This is an OPTIONAL step but if the console font is too small or not readable, we can set it up:
$ setfont latarcyrheb-sun32
We need an internet connection, so let’s configure the network. I connected via ethernet so everything worked out of the box. if you need WiFi, you can set it up by launching iwctl (interaction mode with autocompletion). Here are some useful commands:
`iwctl`
`station list`                        # Display your wifi stations
`station <INTERFACE> scan`            # Start looking for networks with a station
`station <INTERFACE> get-networks`    # Display the networks found by a station
`station <INTERFACE> connect <SSID>`  # Connect to a network with a station
We also need to update our system clock. Let’s use timedatectl(1) to ensure the system clock is accurate:
$ timedatectl set-ntp true
To check the service status, we can use timedatectl status.
Once that’s done, we can start building up to the installation.
Disk Partitioning
This is my disk layout (run lsblk to get this output):
NAME            MAJ:MIN RM   SIZE RO TYPE  MOUNTPOINT
nvme0n1         259:0    0 476,9G  0 disk
├─nvme0n1p1     259:1    0   512M  0 part  /boot
└─nvme0n1p2     259:2    0 476,4G  0 part
  └─luks        254:0    0 476,4G  0 crypt
    ├─main-root 254:1    0    50G  0 lvm   /
    └─main-home 254:2    0   110G  0 lvm   /home
This results in a System with Full Disk Encryption (FDE), aside from the boot partition.
For this I used the parted utility for manipulating the partition table:
$ parted /dev/nvme0n1

(parted) mklabel gpt  # WARNING: wipes out existing partitioning
(parted) mkpart ESP fat32 1MiB 513MiB  # create the UEFI boot partition
(parted) set 1 boot on  # mark the first partition as bootable
(parted) mkpart primary  # turn the remaining space in one big partition
      File system type: ext2  # don't worry about this, we'll format it after anyway
      Start: 514MiB
      End: 100%
Now you can check the created layout:
(parted) print
  Model: Unknown (unknown)
  Disk /dev/nvme0n1: 512GB
  Sector size (logical/physical): 512B/512B
  Partition Table: gpt
  Disk Flags:

  Number  Start   End    Size   File system  Name  Flags
    1      1049kB  538MB  537MB  fat32              boot, esp
    2      539MB   512GB  512GB  ext2

(parted) exit
Setting up Disk Encryption
This will encrypt the second partition, which we’ll then hand off to LVM to manage the rest of our partitions. Doing it this way means everything is protected by a single password.
$ cryptsetup luksFormat /dev/nvme0n1p2
    WARNING!
    ========
    This will overwrite data on /dev/nvme0n1p2 irrevocably.

    Are you sure? (Type uppercase yes): YES
    Enter passphrase:
    Verify passphrase:
Now we need to open the encrypted disk so LVM can do its thing:
$ cryptsetup open /dev/nvme0n1p2 luks

Enter passphrase for /dev/nvme0n1p2:
Setting up LVM
In this section (since we already know about LVM) we will need:
- A Physical Volume: mandatory as a container for LVM.
- A Volume Group: where we will add our partitions:
- Root Partition.
- Home Partition.
- Swap.
Let’s proceed with the commands then:
$ pvcreate /dev/mapper/luks  # create the physical volume
Physical volume "/dev/mapper/luks" (Fernando) successfully created.?

$ vgcreate main /dev/mapper/luks  # create the volume group (Fernando)
 Volume group "luks" successfully created

$ lvcreate -L 100G main -n root  # create a 100GB root partition
 Logical volume "root" created.

$ lvcreate -L 18G main -n swap  # create a RAM+2GB swap, bigger than RAM for hibernate
 Logical volume "swap" created.

$ lvcreate -l 100%FREE main -n home  # assign the rest to home
 Logical volume "home" created.
We can check the layout by running lvs:
$ lvs
  LV   VG    Attr       LSize   Pool Origin Data%  Meta%  Move Log Cpy%Sync Convert
  home main      -wi-a----- 308.43g
  root main      -wi-a----- 100.00g
  swap main      -wi-a-----  18.00g
Format All The Partitions
Now we’re going to format all the partitions we’ve created so we can actually use them.
- First the root partition.
$ mkfs.ext4 /dev/mapper/main-root
...
Allocating group tables: done
Writing inode tables: done
Creating journal (65536 blocks): done
Writing superblocks and filesystem accounting information: done
- Now our home partition.
$ mkfs.ext4 /dev/mapper/main-home
...
Writing superblocks and filesystem accounting information: done
- Time for the Swap.
$ mkswap /dev/mapper/main-swap
Setting up swapspace version 1, size = 18 GiB (19327348736 bytes)
...
- Finally boot partition ONLY when you DO NOT WANT a DUAL-BOOT setup. This must be a FAT32 formatted partition b/c UEFI.
$ mkfs.fat -F32 /dev/nvme0n1p1
...
Installing The Base System
It’s time to install the base system, which we can then chroot into in order to further customise our installation.
A chroot is an operation that changes the apparent root directory for the current running process and their children. A program that is run in such a modified environment cannot access files and commands outside that environmental directory tree. This modified environment is called a chroot jail.
Mounting All The Partitions
Before we can install the OS we need to mount all the partitions and then chroot into the mountpoint of the root partition.
mount /dev/mapper/main-root /mnt
mount /dev/mapper/main-home /mnt/home
mount /dev/nvme0n1p1 /mnt/boot
swapon /dev/mapper/main-swap
Setting Up The Mirrorlist
Next step is to edit /etc/pacman.d/mirrorlist and put the mirrors closest to us at the top. This’ll help speed up the installation.
It is highly recommended that we generate a mirrorlist and unckeck the http checkbox so we only use mirrors we can fetch from over https. (Feel free to mark IPv6 if your connection supports it.)
In my case I generated it for Germany and used curl to get them. Here the steps:
mv /etc/pacman.d/mirrorlist /etc/pacman.d/mirrorlist.bak #Backup just in case.
curl https://archlinux.org/mirrorlist/?country=DE&protocol=https&ip_version=4&ip_version=6
      >> /etc/pacman.d/mirrorlist #Get the mirror list.
rm /etc/pacman.d/mirrorlist.backup #Success: remove the backup file.
vim /etc/pacman.d/mirrorlist
We can also have a look at the status of the mirrors and even for more info, as usual, we can go to the Arch Linux Wiki.
Installing Basic Components
Now that everything is set up we need to bootstrap the OS:
# In case the below command FAILS, we can first run:
# pacman-key --init
# pacman-key --populate archlinux`

pacstrap -i /mnt base linux linux-firmware base-devel lvm2 vim
Let’s break down all these packages we are installing:
- base: Minimal package set to define a basic Arch Linux installation.
- linux: The Linux kernel.
- linux-firmware: Firmware files for Linux
- base-devel: Package group that includes tools needed for building (compiling and linking).
- lvm2: Logical Volume Manager 2 utilities.
- vim: Vim editor for customising configurations.
It’ll now prompt us to confirm our package selection and then start with the installation of the base system. Picking the defaults should be safe and fine.
Configuring the new installation
Now that the base system is there, we can chroot into it to customise our installation and finish it.
Fstab
First we generate an fstab file (use -U or -L to define by UUID or labels, respectively):
$ genfstab -U /mnt >> /mnt/etc/fstab
Check the resulting /mnt/etc/fstab file, and edit it in case of errors.
$ cat /mnt/etc/fstab
Here is an example of my /etc/fstab:
$ cat etc/fstab

# Static information about the filesystems.
# See fstab(5) for details.

# <file system> <dir> <type> <options> <dump> <pass>
# /dev/mapper/main-root
UUID=xxxxxxx-3c01-xxxx-xxxx-ab120fexxxxx	/ ext4 rw,relatime	0 1

# /dev/nvme0n1p1
UUID=52CE-47A9 /boot vfat  rw,relatime,fmask=0022,dmask=0022,
                           codepage=437,iocharset=iso8859-1,
                           shortname=mixed,utf8,errors=remount-ro	0 2

# /dev/mapper/main-home
UUID=xxxxxxx-3c01-xxxx-xxxx-ab120xxxxxxx	/home ext4 rw,relatime	0 2
Now change root into the new system:
$ arch-chroot /mnt
Your prompt will now change to: [root@archiso /]#.
Locale
Let’s edit our Locale Information by opening the /etc/locale.gen file and uncommenting en_US.UTF-8 UTF-8 and other needed locales: In my case also: de_DE.UTF-8 UTF 8 (since I live in Germany).
Once we are done, we need to generate them by running:
$ locale-gen
As a last step in this section, let’s execute the following in order to create the locale.conf(5) file and set the LANG variable accordingly:
$ echo LANG=en_US.UTF-8 > /etc/locale.conf
$ export LANG=en_US.UTF-8
Timezone
Let’s set our timezone by running:
$ tzselect
Once we have selected our timezone we need to update a few more things. First override the /etc/localtime file and symlink it to your timezone with this format:
$ ln -sf /usr/share/zoneinfo/<continent>/<location> /etc/localtime
In my case (Berlin):
$ ln -sf /usr/share/zoneinfo/Europe/Berlin /etc/localtime
Time so sync the clock settings and set the hardware clock to UTC by running hwclock(8) to generate /etc/adjtime:
$ hwclock --systohc --utc
Vconsole
This part will set the keyboard layout and font to be used by the virtual console as default values.
Let’s create the /etc/vconsole.conf configuration file and add keyboard configuration:
$ vim /etc/vconsole.conf

KEYMAP=us
At this point we could also (OPTIONAL) set another font by adding this to the mentioned file:
FONT=latarcyrheb-sun32
KEYMAP=us
Hostname
Time to give your system a name by adding that to /etc/hostname. As mentioned earlier, I am:
android10-xps-arch
Also, add a line for that same hostname to /etc/hosts:
$ vim /etc/hosts

# Static table lookup for hostnames.
# See hosts(5) for details.
127.0.0.1	localhost
::1               localhost
127.0.1.1	android10-xps-arch.localdomain android10-xps-arch
If the system has a permanent IP address, it should be used instead of 127.0.1.1.
GPU Power Saving
For this purpose, we have to create /etc/modprobe.d/i915.conf with the following content:
options i915 enable_guc_loading=-1 enable_guc_submission=-1
Mkinitcpio
We need to modify /etc/mkinitcpio.conf and add the following information
- set
MODULESto:(nvme i915 intel_agp) - set
HOOKSto:(base autodetect systemd block sd-vconsole sd-encrypt sd-lvm2 fsck keyboard filesystems)
Let’s regenerate the initramfs: For LVM, system encryption or RAID, modify mkinitcpio.conf(5) and recreate the initramfs by executing the following command:
$ mkinitcpio -p linux
If the command fail (it happened to me) and you see something like:
`specified kernel image does not exist /boot/vmlinuz-linux`
You might need to first reintall the linux kernel and then re run the above command:
$ pacman -S linux
$ mkinitcpio -p linux
The command output should look like this:
==> Building image from preset: /etc/mkinitcpio.d/linux.preset: 'default'
  -> -k /boot/vmlinuz-linux -c /etc/mkinitcpio.conf -g /boot/initramfs-linux.img
==> Starting build: 4.13.9-1-ARCH
  -> Running build hook: [base]
  -> Running build hook: [systemd]
  -> Running build hook: [autodetect]
  -> Running build hook: [keyboard]
  -> Running build hook: [sd-vconsole]

...

  -> Running build hook: [block]
==> WARNING: Possibly missing firmware for module: wd719x
==> WARNING: Possibly missing firmware for module: aic94xx
  -> Running build hook: [sd-encrypt]
  -> Running build hook: [sd-lvm2]
  -> Running build hook: [filesystems]
  -> Running build hook: [fsck]
==> Generating module dependencies
==> Creating gzip-compressed initcpio image: /boot/initramfs-linux-fallback.img
==> Image generation successful
Don’t worry about those two warnings, the XPS 13 doesn’t have any hardware on board that needs those drivers.
Microcode
Sometimes bugs are discovered in processors for which microcode updates are released. These updates provide bug fixes that can be critical to the stability of your system. Without them, you may experience spurious crashes or unexpected system halts that can be difficult to track down.
This module is loaded together with the initramfs when your system boots, let’s install the package for it:
$ pacman -Sy intel-ucode
Setting Up The Bootloader
We will be using systemd-boot as our bootloader.
In order to start, we need to tell bootctl to install the necessary things onto /boot:
$ bootctl install --path=/boot
In the future we won’t need to call install, but update instead. The good thing is that there is a hook that can be installed which will do this automatically every time we perform a full system upgrade. We are going to do it later once we have a full system up and running.
Let’s edit /boot/loader/loader.conf and make it look like this:
timeout 10
default arch
editor 1
By setting editor 1 it’s possible for anyone to edit the kernel boot parameters, add init=/bin/bash and become root on your system. However, since the disk is still encrypted at this point they can’t do much with it. For instance I think this is very convenient to be able to edit those options when something does go wrong.
We now need to create the boot entry named arch. To that end, create the file /boot/loader/entries/arch.conf with the following content:
title Arch Linux
linux /vmlinuz-linux
initrd /intel-ucode.img
initrd /initramfs-linux.img
options luks.uuid=$UUID luks.name=$UUID=luks
        root=/dev/mapper/main-root rw
        resume=/dev/mapper/main-swap ro
        intel_iomu=igfx_off quiet mem_sleep_default=deep
        snd_hda_intel.dmic_detect=0

# NOTE: options should be in the same line separated by
# spaces. Here I formatted this way for better understanding.
Replace $UUID with the value from this command:
$ cryptsetup luksUUID /dev/nvme0n1p2
OPTIONAL: Windows Dual-Boot
In case we already have a Windows Intallation, here are GOOD NEWS from the Arch Linux Wiki:
I performed this step in another installation and everything was recognized automatically and added to the bootloader entries.
Sudo
For commands execution, it is always preferable to use sudo over changing to root. In order to do so we need to install the sudo package and update its configuration:
$ pacman -Sy sudo
Now let’s go to the configuration file:
$ sudo visudo
Next step is to update the configuration and uncomment the line that reads %wheel ALL=(ALL) ALL plus add some extra configuration at this point to save time when creating our first user, (here fernando is going to be my username):
...
##
## User privilege specification
##
root ALL=(ALL) ALL

# Options
Defaults editor=/usr/bin/vim, !env_editor
Defaults insults

# Full Access
fernando ALL=(ALL) ALL

# Last rule as a safety guard
fernando ALL=/usr/sbin/visudo

# Uncomment to allow member of group wheel to execute any command
%wheel ALL=(ALL) ALL
...
Creating a User Account
We now have to create a user account mentioned in the step above for ourselves and ensure we are added to the wheelgroup:
$ useradd -m -G wheel,users -s /bin/bash fernando
$ passwd fernando
    New password:
    Retype new password:
    passwd: password updated successfully
Installing GNOME
We need a Graphical User Interface. There are many options out there and I’m not going to point out which is better or worse, personally I think it is a matter of taste. Here are the most popular ones:
- GNOME 3 (our choice in this guide).
- KDE Plasma.
- Xfce.
We will take advantage of this step and add a couple of extras, so let’s do it by executing the following commands:
$ pacman -Sy gnome gnome-extra dhclient iw dialog
$ pacman -Sy networkmanager network-manager-applet xf86-input-libinput
Something worth mentioning is that I researched a lot to build up this guide and part of it was inspired by one created by Daniele Sluijters who gave a good point about what is the reason behind installing dhclient over dhcpd:
I explicitly install
dhclientbecausedhcpdisn’t very good at dealing with non-spec compliant DHCP implementations. Especially if you have a D-Link router or might encounter one, install this package. It also avoids some issues I’ve had on large networks like at the office, Eduroam etc.
After we are done with the installation, we have to enable both services GDM (gnome) and Network Manager:
$ systemctl enable gdm
$ systemctl enable NetworkManager
Booting into the System
So the time has come…If you are still there, I have to say WOW! Congratulation! You have survived to your first (or one more) installation of Arch Linux, which is great. I’m proud of you and I am also sure you have been learning a lot so far.
So one of our last steps will be to exit the chroot:
$ exit
Unmount our filesystems:
$ umount -R /mnt
And finally reboot
$ reboot
 Arch Linux up and running with GNOME 3
One Last Upgrade
You though you were done right? The answer to this question is: Yes and No :).
One last thing: Since you might have used an ISO image, it could be that it is not the latest so let’s do a full system upgrade before continuing:
$ sudo pacman -Syu
Post Installation MUSTs
LTS Kernel
By default we have (installed) the latest stable linux kernel version. LTS stands for: Long Term Support, which means that this kernel will not be updated as frequently as the most recent one.
Here is a char that simplify differences between them:
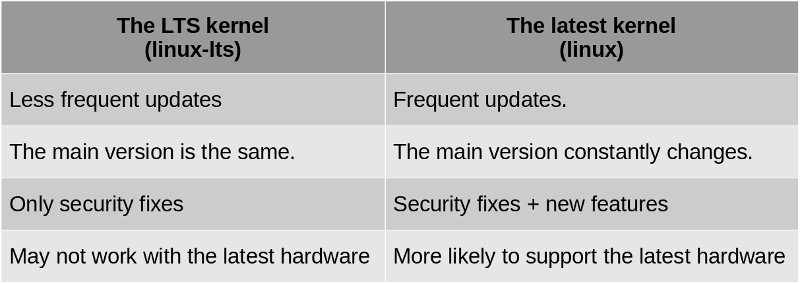 The good news is that we can have both installed and choose with which one we want to start our system.
It does not hurt at all to have both installed, actually in my experience, when we want to try the latest state of the art kernel functionalities by using the latest version, it could happen that either something stops working or there is some misbehaviour, so by having the LTS version could also be a life saver to fix things (refer to the troubleshooting section).
- Let’s proceed by running this command in order to install the LTS Kernel:
$ sudo pacman -S linux-lts
- We need to add an entry for our boot loader, so we copy our
/boot/loader/entries/arch.conffile and name itarch-lts.conf:
$ sudo cp /boot/loader/entries/arch.conf /boot/loader/entries/arch-lts.conf
- Afterwards we open the file (
sudo vim /boot/loader/entries/arch-lts.conf) and ONLY modify the first 2 LINES:
title Arch Linux LTS
linux /vmlinuz-linux-lts
...
- We can now restart our system, choose the ‘Arch Linux LTS’ option during boot, and check out our current Linux Kernel with this command:
$ uname -r
AUR Helper
Arch Linux has an amazing Package Manager (pacman) but one of the things which makes Arch AMAZING is its community. There will be cases where pacman is not going to be enough and you will need to use a AUR Helper in order to download and install software created/maintained by the community.
There are several AUR Helpers out there and nowadays people are talking very good about Yay (written in Go) but I will personally stick to the old school way and use Pacaur, which has been written in bash and pretty much emulates pacman behavior.
I will also ad the steps to install Yay and give it a try. The choice is yours.
Since AUR Helpers are NOT part of the Core Arch Linux Repository we need to install them manually.
Installing Pacaur
- Let’s install first required packages:
$ sudo pacman -S binutils make gcc fakeroot expac yajl jq wget gtest gmock wget --noconfirm
- Pacaur relies on auracle in order to install AUR packages, so let’s set it up:
# We get the auracle `.tar.xz` file
$ wget https://aur.archlinux.org/cgit/aur.git/snapshot/auracle-git.tar.gz

# We need to uncompress the downloaded file
$ tar -xzf auracle-git.tar.gz

# Now we build the package
$ cd auracle-git
$ makepkg PKGBUILD --skippgpcheck --noconfirm

# We use pacman to install the already generated package
$ pacman -U auracle-git-*
- We have to create a temporary working directory for installing Pacaur:
$ mkdir -p ~/tmp/pacaur_install
$ cd ~/tmp/pacaur_install
- We install pacaur from AUR: Download the files from git, build a
.tar.xzfile and then we install it:
$ curl -o PKGBUILD https://aur.archlinux.org/cgit/aur.git/plain/PKGBUILD?h=pacaur
$ makepkg -i PKGBUILD --noconfirm
$ sudo pacman -U pacaur*.tar.xz --noconfirm
- As a last step, let’s clean up the system: temporary directories deletion:
$ rm -r ~/tmp/pacaur_install
$ cd
Installing Yay
- If you have already intalled Pacaur following the instructions above, it is pretty straightforwrd, it only requires you to run this command:
$ pacaur -S yay
- Otherwise follow these steps:
pacman -S --needed git base-devel
git clone https://aur.archlinux.org/yay.git
cd yay
makepkg -si
Updating the EFI Boot Manager
In the section Setting Up The Bootloader, we have mentioned, that whenever there is a new version of systemd-boot, the boot manager can be optionally reinstalled by the user (we are the users :)).
This can be performed manually (REMEMBER: Automate all things!) or the update can be automatically triggered using pacman hooks, which is what we are going to do here by just installing the package systemd-boot-pacman-hook (in the AUR Repository), which will automate this process:
$ pacaur -S systemd-boot-pacman-hook
Extras
Everything from here is entirely OPTIONAL and based on PERSONAL TASTING. I just want to share my full setup with the hope that you can also get something useful out of it :).
Tools and Utilities
- Tweeks Tool: I use Gnome 3 so its counterpart for this purpose is Gnome-Tweaks which let me to unlock and setup hidden functionalities.
- Browsers: I like to have different ones, so not a surprise: Firefox, Chromium and Google Chrome.
- Video Player: Vlc, which contains all the necessary codecs to play pretty much anything.
- Photo Editor: Gimp, a must if you are using Linux.
- Image Viewer: Imv, A tiny one that I can even call from the command line when browsing directories.
- Image Utilities: GraphicsMagick, is the swiss army knife of image processing and manipulation.
Let’s install all this: We can do it in a batch processing fashion:
$ pacaur -S firefox google-chrome chromium vlc gimp gnome-tweaks imv graphicsmagick
Default Shell
And my choice here is oh-my-zsh due to its flexibility, customization and plugins system. You can do anything you want.
I also opted for the PowerLevel10k theme… check the final result:
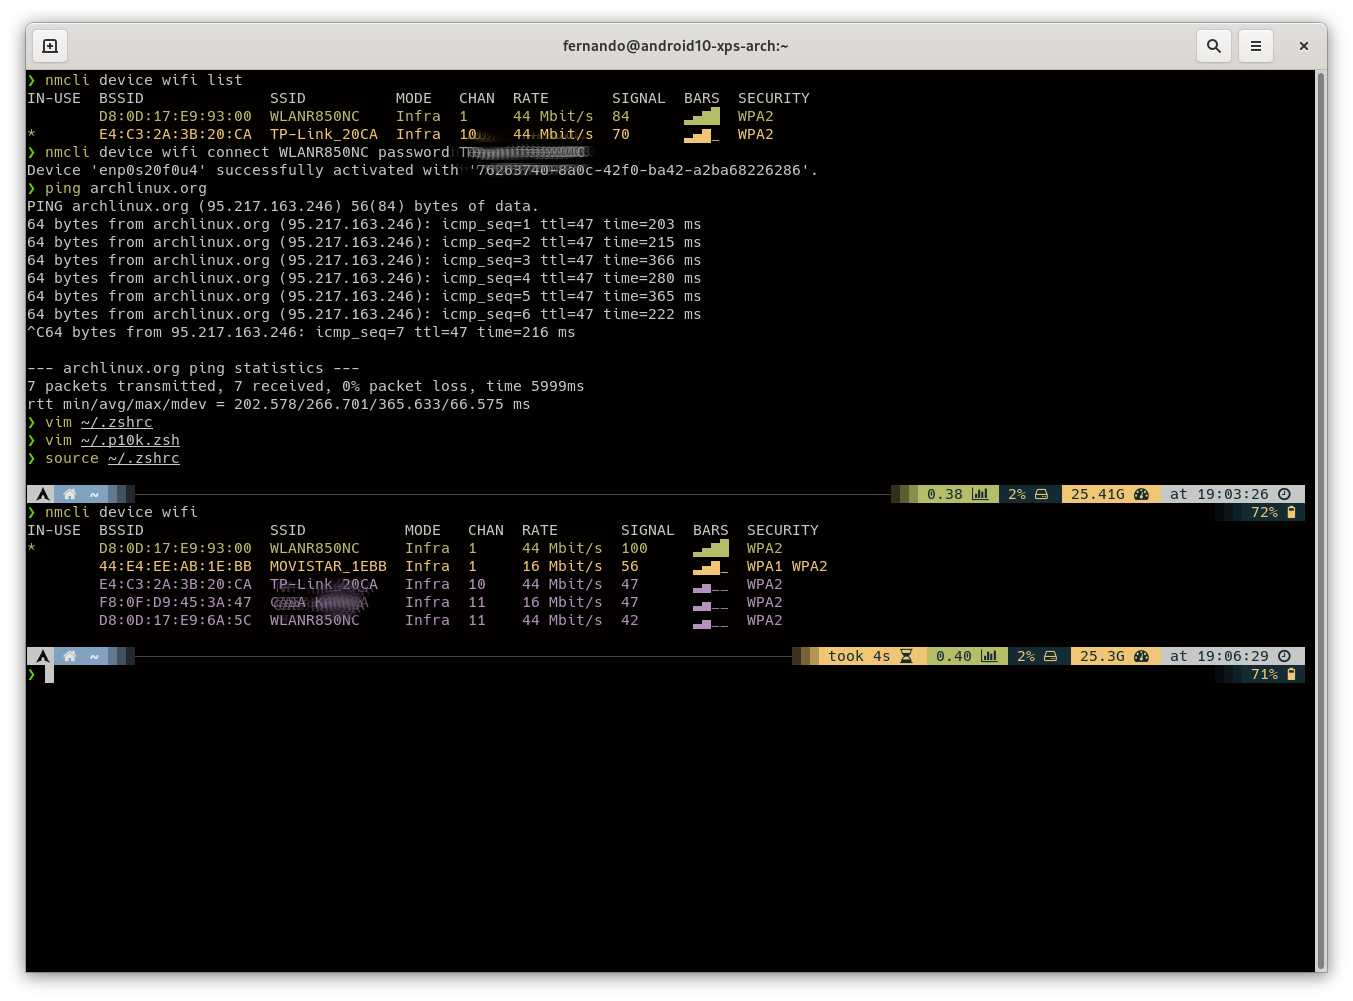 oh-my-zsh customized using the PowerLevel10k them.
- Step 1: Install Zsh (if not currently using it):
$ pacaur -S zsh oh-my-zsh-git
- Step 2: Make Zsh your default shell (restart so your shell change takes effect):
$ chsh -l
$ chsh -s /usr/bin/zsh
- Step 3: Install and enable the Powerlevel10k theme:
$ yay -S --noconfirm zsh-theme-powerlevel10k-git
$ echo 'source /usr/share/zsh-theme-powerlevel10k/powerlevel10k.zsh-theme' >>~/.zshrc
- Step 4: Install Nerd Fonts Hack:
$ pacaur -S nerd-fonts-hack
- Step 5: Migrate from Bash (skip if you are already using it):
We will have to move some content from your files .bash_profile and .bashrc to .zshrc and .zprofile respectively.
- Step 6: This is my theme configuration in .zshrc file with the plugins (copy and paste :)):
# Enable Powerlevel10k instant prompt. Should stay close to the top of ~/.zshrc.
# Initialization code that may require console input (password prompts, [y/n]
# confirmations, etc.) must go above this block; everything else may go below.
if [[ -r "${XDG_CACHE_HOME:-$HOME/.cache}/p10k-instant-prompt-${(%):-%n}.zsh" ]]; then
  source "${XDG_CACHE_HOME:-$HOME/.cache}/p10k-instant-prompt-${(%):-%n}.zsh"
fi

# Path to your oh-my-zsh installation.
ZSH=/usr/share/oh-my-zsh/

export DEFAULT_USER="fernando"
export TERM="xterm-256color"
export ZSH=/usr/share/oh-my-zsh
export ZSH_POWER_LEVEL_THEME=/usr/share/zsh-theme-powerlevel10k

source $ZSH_POWER_LEVEL_THEME/powerlevel10k.zsh-theme

plugins=(archlinux
	bundler
	docker
	jsontools
	vscode web-search
	k
	tig
	gitfast
	colored-man-pages
	colorize
	command-not-found
	cp
	dirhistory
	autojump
	sudo
	zsh-syntax-highlighting
	zsh-autosuggestions)
# /!\ zsh-syntax-highlighting and then zsh-autosuggestions must be at the end

source $ZSH/oh-my-zsh.sh

# Uncomment the following line to disable bi-weekly auto-update checks.
DISABLE_AUTO_UPDATE="true"

ZSH_CACHE_DIR=$HOME/.cache/oh-my-zsh
if [[ ! -d $ZSH_CACHE_DIR ]]; then
  mkdir $ZSH_CACHE_DIR
fi

source $ZSH/oh-my-zsh.sh
- Step 7: You can also customize even more if you go to the
.p10k.zshfile, which is very well documented:
$ vim ~/.p10k.zsh
- Step 8: Setup font in GNOME (skip if not a GNOME user):
- Install GNOME Tweaks in case you have GNOME.
- Set the system monospace font to “Hack Nerd Font Regular” and size, current one + 1.
- In the Terminal’s Font Preference, I leave the Custom Font option unchecked, .i.e use system font.
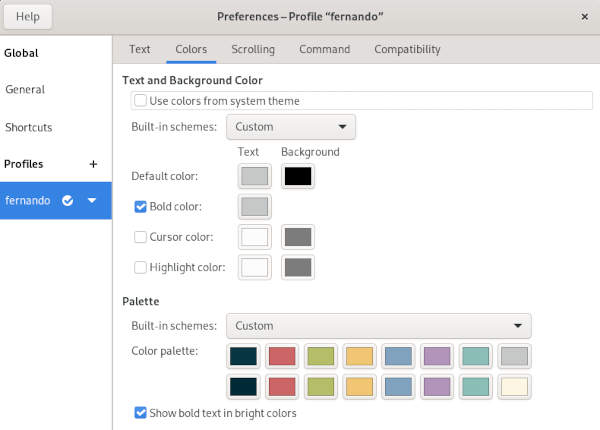 My Color Palette in the Terminal Preferences.
Developer Tools
Here are the ones:
- Git: The by default free and open source distributed version control system.
- Asdf: A CLI tool for managing multiple runtime versions and programming languages.
- Android Studio: is the official IDE for Google’s Android operating system, built on JetBrains’ IntelliJ IDEA software and designed specifically for Android development.
- Docker: A set of platform as a service products that use OS-level virtualization to deliver software in packages called containers.
- VSCode: I use the open source release version which is called Code (Microsoft VSCode uses this one as base for its product).
- Zeal: An offline documentation browser for software developers.
- Intellij: IDE for mainly Kotlin, Java and Scala. But is supports many programming languages through its plugin system.
- Slack: Communication and Collaboration Tool.
Installation:
$ pacaur -S git asdf android-studio docker code zeal intellij slack
Troubleshooting
In case we face problems, it is important to have written down all the necessary steps just for the sake of properly starting our system with a Rescue Disk (the same USB Drive we set up already).
We plug our Bootable USB Drive and boot into the system.
We need to open the encrypted disk so LVM can do its thing:
$ cryptsetup open /dev/nvme0n1p2 luks

Enter passphrase for /dev/nvme0n1p2:
- We setup the internet connection with
iwctl:
`iwctl station list` # Display your wifi stations
`iwctl station station scan` # Start looking for networks with a station
`iwctl station station get-networks` # Display the networks found by a station
`iwctl station station connect network_name` # Connect to a network with a station
- We need to mount all the partitions:
$ mount /dev/mapper/main-root /mnt
$ mount /dev/mapper/main-home /mnt/home
$ mount /dev/nvme0n1p1 /mnt/boot
$ swapon /dev/mapper/main-swap
- Change root into the new system:
$ arch-chroot /mnt
Now you are ready to work and fix Arch Linux just in case something unexpected ocurred.
- And when we are done, we exit the chroot:
$ exit
- Unmount our filesystems:
$ umount -R /mnt
- Reboot our system:
$ reboot
This specific installation uses ‘ext4’ as a file system but if you use ‘btrfs’, I have added troubleshooting information in my Linux Wiki
Conclusion
This has been such a ride! A very long but (hopefully) a fulfilling process. I have no more words than saying THANKS for READING!
I hope you found the material useful and of course any feedback is more than welcome, so feel free to drop me a line in any of the social networks that appear in this website.
From here, I will leave up to you to continue diving deeper into the Linux Ecosystem and finish up with an inspirational quote:
“Wisdom is not a product of schooling but of the lifelong attempt to acquire it.”
References
- Arch Linux Official Installation Guide.
- Arch Linux Wiki: Data-at-rest encryption.
- Arch Linux Wiki: dm-crypt/Encrypting an entire system.
- Arch Linux Wiki: Dm-crypt/Device encryption.
- Arch Linux Wiki: Systemd-boot.
- Arch Linux Wiki: Fstab.
- Arch Linux Wiki: EFI System Partition.
- Arch Linux Wiki: Parted Utility.
- Arch Linux Wiki: Mkinitcpio.
- Arch Linux Wiki: Dual Boot with Windows.
- Arch Linux Dell XPS 13 - Model 9310.
- Arch Linux Dell XPS 13 - Model 7390.
- Arch Linux and the XPS 13 9360.