An over-engineered Home Lab with Docker and Kubernetes.

Setting up a personal Home Lab is not a task for lazy people: it incurrs a big cost of maintenance and issues arise even though we might use the best IT-Infrastructure practices… but we can always learn a lot out of it and make it also super fun. In this post I would like to share my journey and share some tips and tricks and issues I bumped into. Let’s jump in!
“Instead of WORRYING about what you cannot control, SHIFT your ENERGY to what you can create.”
- Introduction
- But…Why???
- Bare Metal
- Main Software Stack
- The Kubernetes Approach
- Rules of (Over)-Complexity
- A simpler Docker Approach
- Monitoring
- Security
- Fault Tolerance and Resilience
- Server Administration
- The final Result
- Tips and Tricks
- Alternatives
- Other Infrastructure tooling
- Conclusion
- References
Introduction
After a long time of procrastination, I finally finished this blog post where I would like to share my journey on setting up my personal HOME LAB. This includes 2 different approaches: Kubernetes and Docker.
I will also highlight some of the problems I bumped into, the cost of maintenance and some tips and tricks.
SPOILER: I started with Kubernetes and ended up with a pure/plain Docker approach. Both are great tools and should be used for their intended purpose. So in order to understand what happened here, let’s start this journey and jump on this train!!!
But…Why???
I strongly believe that this is the first question we have to ask ourselves whenever we decide to go for such a complex project.
We have to establish our goals, so here are mine:
- LEARNING PURPOSE: Kubernetes and Docker are mature tools that have been around for years and they are widely used.
- DATA PRIVACY: Keeping and owning my own data is a HIGH PRIORITY for me.
Whenever we make such a decision, we need to keep in mind the commitment to the project, which includes the following time investment:
- MAINTENANCE: we have to keep our infrastructure constantly ‘up to date’… and yes, automate all the things, but still checking release notes, incompatible breaking changes, migrations, etc, which could lead to headaches and extra time consumption.
- TROUBLESHOOTING: there is always going to be issues, not only for the items mentiones above, but also because of the server(s) hardware, network, internet connection, etc. This is a project with complex moving parts, so we have to be prepared for it too.
Bare Metal
Software does not exists without Hardware backing it up… and to be honest, I could have done pretty much all this via some cloud providers, but then, neither this is no longer a HOME LAB nor a fully PRIVATE HOME SERVER, so I opted for the following bare metal:
- 2 Intel NUC Mini PCs.
- 1 Modem/Router hosting my Internet Connection with Port Forwarding Support.
- 1 Router with OpenWRT OS support.
- 1 Network Attached Storage (NAS).
 Arch Linux with LTS Kernel is my choice as my Home Lab Server.
Main Software Stack
- Kubernetes: for managing containerized workloads and services.
- Docker: for managing containerized applications.
- Linux.
- Arch: with LTS Kernel (for stability) as the main OS for the Servers.
- OpenWRT: for network handling (DNS, Port Forwarding, DHCP, etc) inside my router.
- Wireguad: for the encrypted virtual private network (VPN).
The Kubernetes Approach
This was my first approach, based on Kubernetes, so in order to understand what tha means, here is what the official website writes down:
“Kubernetes is a portable, extensible, open source platform for managing containerized workloads and services, that facilitates both declarative configuration and automation. It has a large, rapidly growing ecosystem. Kubernetes services, support, and tools are widely available.”
At first I set up the official Kubernetes (k8s) but then I realized that there is a more lightweight version of it, which fulfilled my needs. It is also called Kubernetes (k3s), and it is basically a single binary that only takes up around 50 MB of space and has low resource usage of around 300 MB of RAM. Even thought there are tiny differences, they are both mostly compatible, so learning one will pretty much cover the other. That is perfect!!!
Kubernetes: The Main Components
Before continuing, it is VERY IMPORTANT to understand some of the concepts or fundamental blocks that are part of Kubernetes. Here is a summary in a very simplistic way:
- Cluster: When we deploy Kubernetes, we get a cluster.
- Node: A node is a working machine in Kubernetes.
- Pod: A Pod represents a set of running containers in our cluster.
- Control Plane: The container orchestration layer that exposes the API and interfaces to define, deploy and manage the lifecycle of containers.
Of course we are just scratching the surface here, but for our purpose, that is enough. There is way more, and for a deeper explanation, refer to the official Kubernetes Documentation.
Kubernetes: Home Lab Architecture
Now that we understand the Kubernetes main concepts, here is a raw picture of my Home Lab Infrastructure with Kubernetes (k3s):
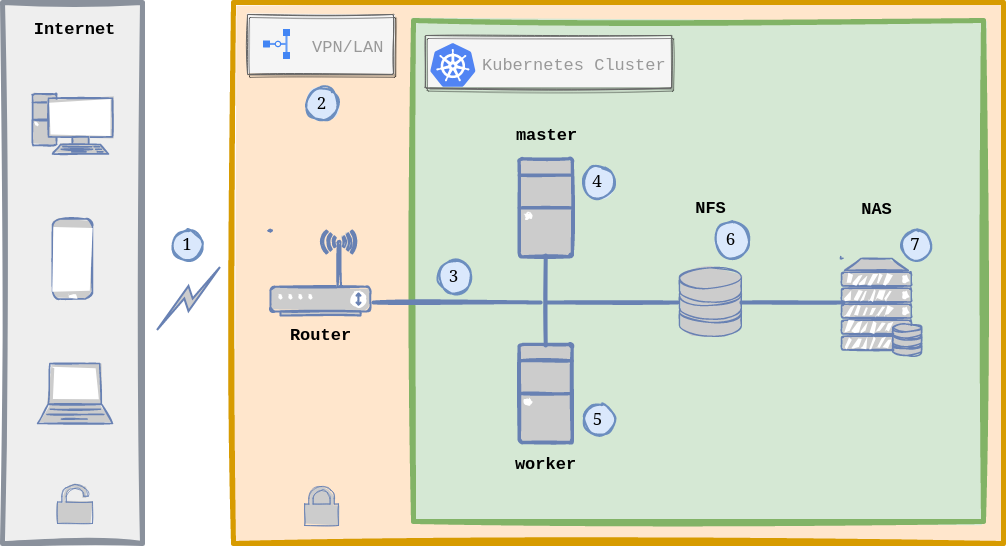 Home Lab General Architecture with Kubernetes.
WHAT IS GOING ON? In a nutshell, here is the normal flow when accessing any of the hosted services in my Arch Linux servers:
- Traffic comming from the Internet (via Dynamic DNS) is received by the Router.
- The router runs OpenWRT as OS and hosts and manages the VPN using Wireguard (more on this in the Security Section).
- Once the request passes the security checks of the VPN, we are inside our Local Area Network (LAN), zone of Linux Servers and for instance, the Kubernetes Cluster.
- The Kubernetes Cluster is composed by 2 Nodes running Linux: one node being the master (Kubernetes Control Plane) and the other is a worker.
- In Reality both Kubernetes Nodes can act as workers, meaning that the load is distributed between both nodes via Ingress (usually NGINX), which acts as a Load Balancer and Reverse Proxy.
- Persistence is handled by NFS (Network File System), which means that there is only one single point where I store my data/information.
- The NAS (Network Attached Storage) contains some services specific to it (from Synology) and acts as a drive (via NFS) that both Linux Servers see as a local drive.
Kubernetes: Application Flow
Now that we have the big picture on what is going on, mostly at hardware level (mentioned in the previous section), the next step would be to answer the following question:
What happens when I reach any hosted app contained in the Kubernetes Cluster?
A picture is worth a thousand words:
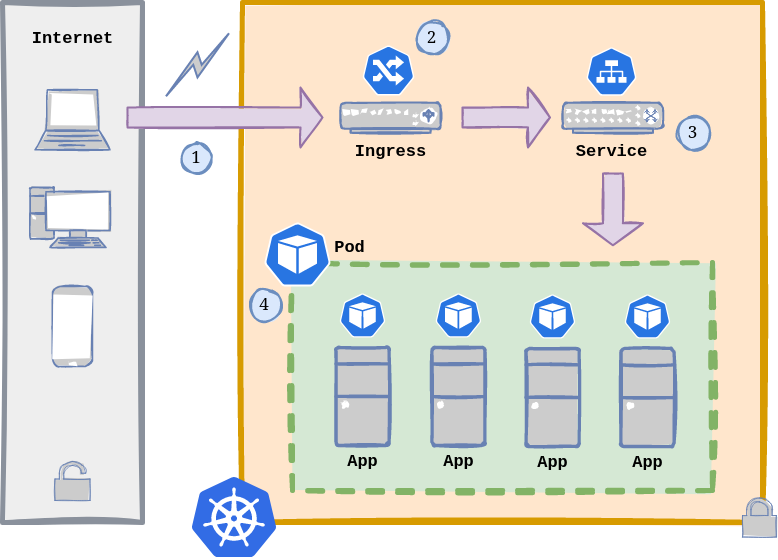 Kubernetes Application Flow.
As we can see, this is the flow:
- A request enters our Kubernetes cluster from the outside (either from the Internet or LAN).
- As mentioned before, an Ingress has these main functions:
- Load Balancer: when it is declared as
Service.Type=LoadBalancer. - Reverse Proxy: exposes HTTP and HTTPS routes from outside the cluster to services within the cluster.
- Load Balancer: when it is declared as
- A Service is a method for exposing a network application that is running as one or more Pods in our cluster (if we skip setting up a service, we are not gonna be able to reach our containerized apps).
- Pods are the smallest deployable units of computing that we can create and manage. Each of them is a group of one or more containers, with shared storage and network resources, and a specification for how to run the containers.
Kubernetes: Cluster setup
Now we have to get our hands dirty and start setting up our cluster.
At this point in time, I assume that we have the minimum set of requirements in place:
- A LINUX SERVER up and running (if it is just for testing, we could also use a couple of VMs).
- SSH (or alternative/){: target=”_blank” }) properly configure in our headless server in order to manage it.
- OPTIONAL: NFS up and running in our server, in case we want to store our data/information in an external network drive outside of our Linux Server.
These are the steps and list of ingredients we need for our recipe:
1. Install k3s MASTER and WORKER nodes.
2. Install kubectl (if not already installed after Step 1) in order to connect remotely to the cluster.
3. Install Helm if necessary, a package manager for Kubernetes, which will facilitate actually installing packages in our cluster.
4. Setup a Load Balancer. k3s already comes with ServiceLB, but I found MetalLB the right option for bare metal, because it makes the setup easier on clusters that are not running on cloud providers (we have to disable ServiceLB though){: target=”_blank” }.
5. Install Nginx Web/Reverse Proxy, which is our Ingress, in order to expose HTTP and HTTPS routes from outside the cluster to services within the cluster. k3s recommends another option too: Traefik, so up to you.
6. Install and configure cert-manager. I would label this as OPTIONAL but I guess we want to be able to have valid SSL/TSL Certificates to avoid our browser warning us when accessing our hosted applications.
7. Deploy and configure Kubernetes Dashboard, which is a web-based Kubernetes user interface.
If everything went well so far, we should be able to see information about our cluster by running:
$ kubectl get nodes -o wide

NAME           STATUS   ROLES    AGE     VERSION         INTERNAL-IP    EXTERNAL-IP
kube-master    Ready    master   44h     v1.25.0+k3s.1   192.168.0.22   <none>
kube-worker    Ready    <none>   2m47s   v1.25.0+k3s.1   192.168.0.23   <none>
Or we can also access our Kubernetes Dashboard (sample picture):
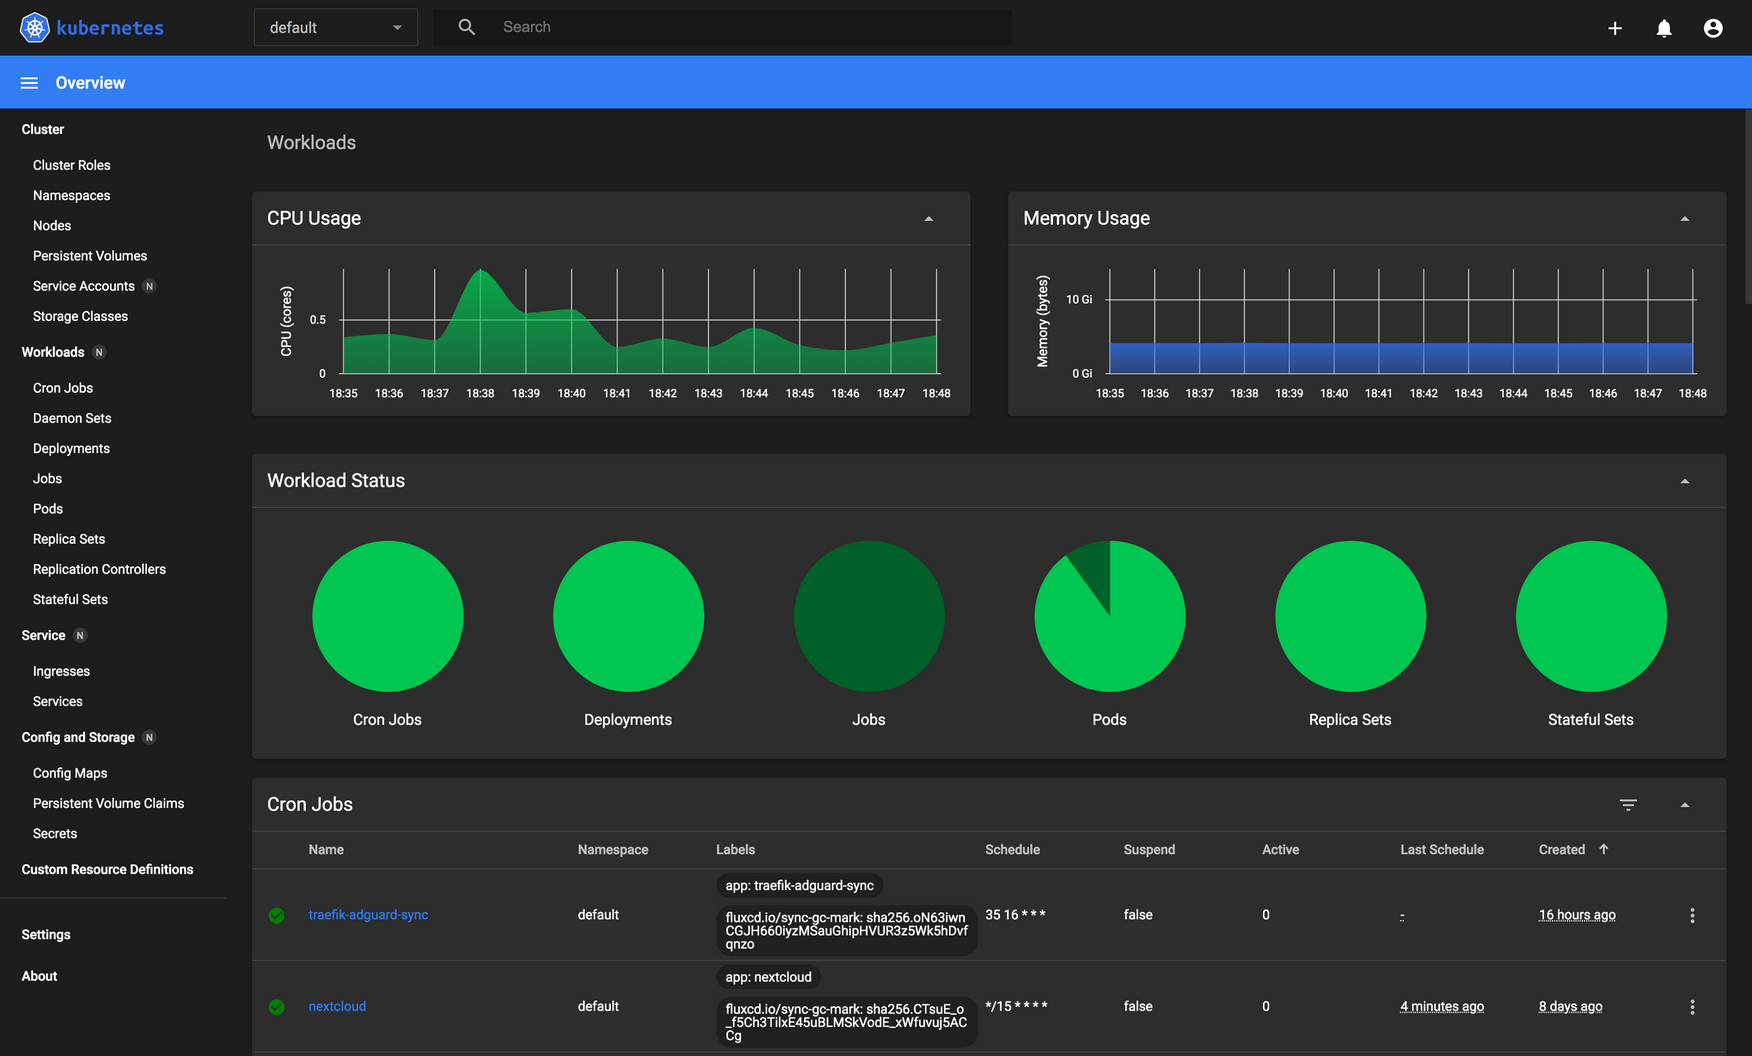 The kubernetes-dashboard provides a great UI to manage our cluster.
Kubernetes: Administration
We have a variety of tools in this area:
kubectl(already installed).- Kubernetes Dashboard (already installed).
- Lens.
- kuvenav.
- k9s.
I would say that it is up to you, to choose the one that better fulfills your requirements.
Also, let’s not forget to check the Addons sections in the Kubernetes Official Documentation.
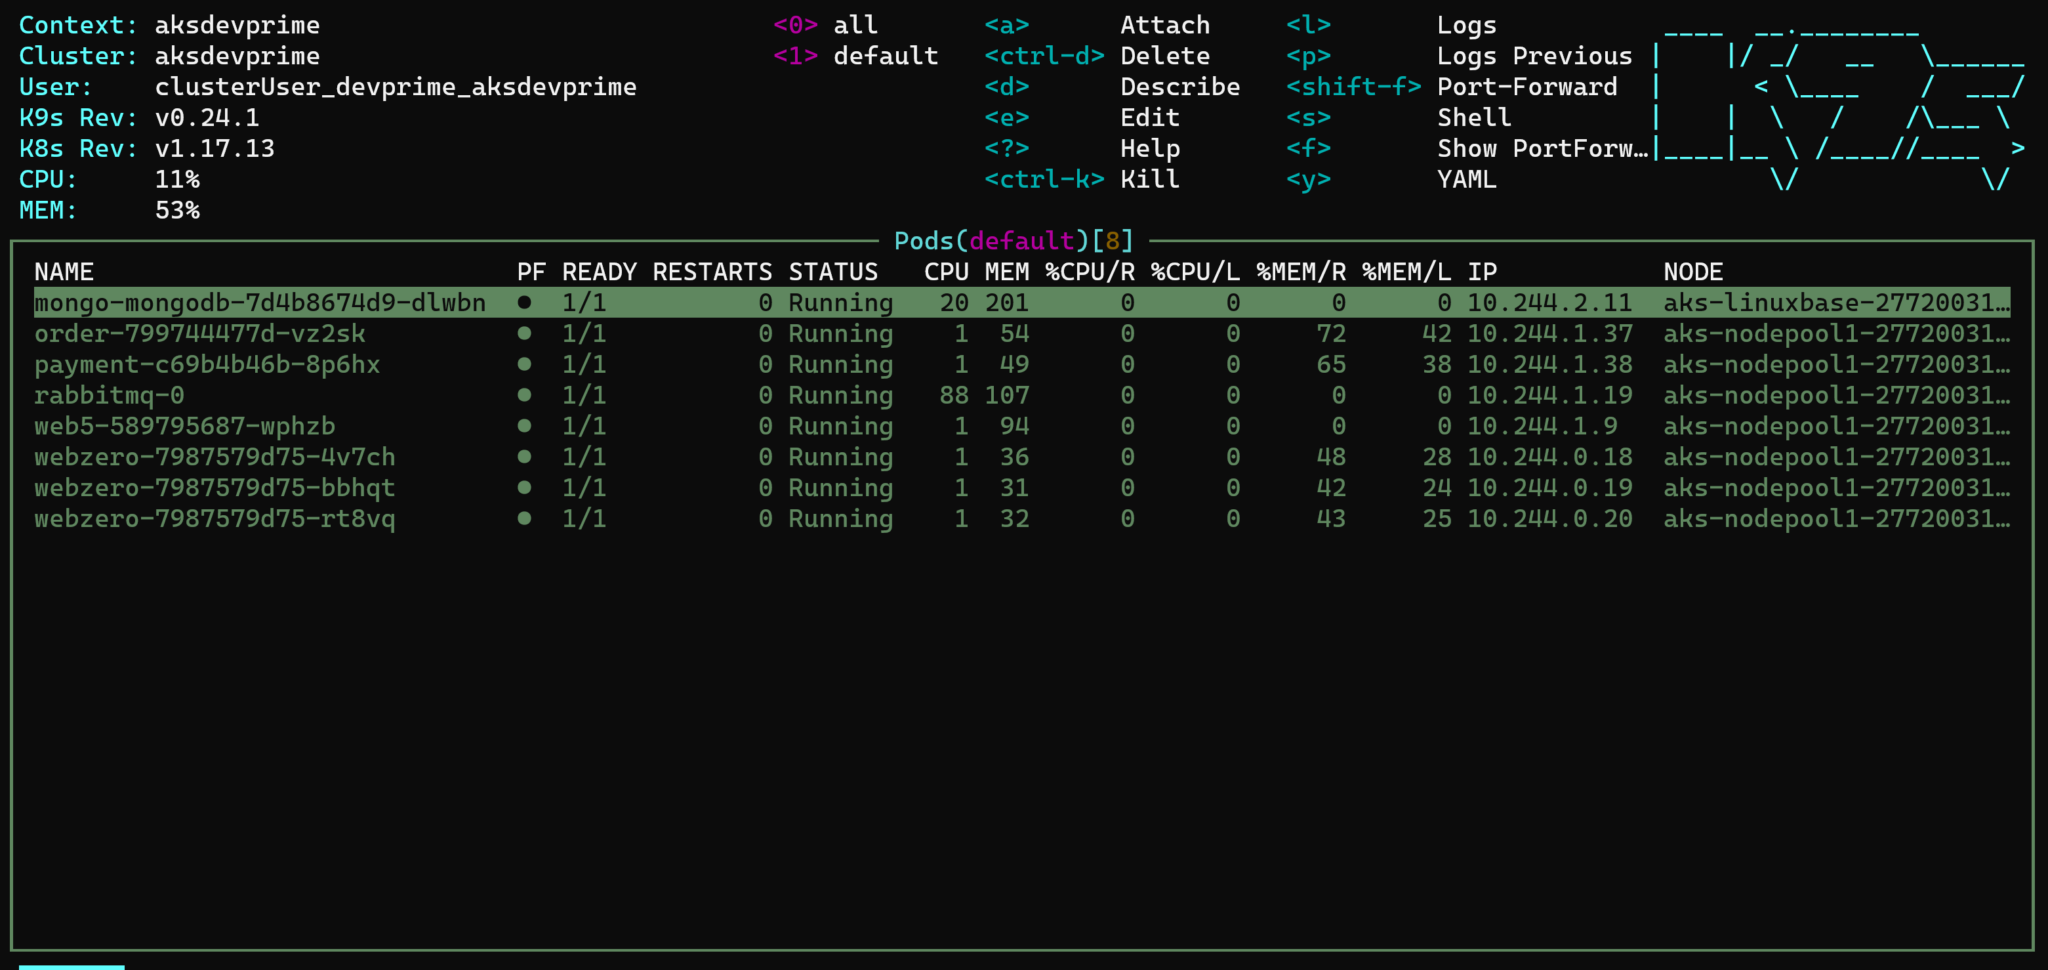
k9s is such a powerful Kubernetes Terminal Client.
Kubernetes: Application Example
This is a simple example where we will be deploying https://draw.io/ to our Kubernetes cluster.
$ kubectl create namespace home-cloud-drawio
- Second, we create a file called
drawio-app.ymlwith the following content:
apiVersion: apps/v1
kind: Deployment
metadata:
  namespace: home-cloud-drawio
  name: drawio
spec:
  replicas: 1
  selector:
    matchLabels:
      app: drawio
  template:
    metadata:
      labels:
        app: drawio
    spec:
      containers:
      - name: drawio
        image: jgraph/drawio
        resources:
          limits:
            memory: "256Mi"
            cpu: "800m"
        ports:
        - containerPort: 8080
---
apiVersion: v1
kind: Service
metadata:
  namespace: home-cloud-drawio
  name: drawio-service
spec:
  selector:
    app: drawio
  ports:
  - port: 5001
    targetPort: 8080
---
apiVersion: networking.k8s.io/v1
kind: Ingress
metadata:
  namespace: home-cloud-drawio
  name: drawio-ingress
  labels:
    name: drawio-ingress
spec:
  rules:
  - host: home-cloud-drawio
    http:
      paths:
      - pathType: Prefix
        path: "/"
        backend:
          service:
            name: drawio-service
            port:
              number: 5001
  ingressClassName: "nginx"
- As a third step, we apply the configuration contained in the
drawio-app.ymlfile:
$ kubectl apply -f drawio-app.yml
BOOM!!! We have basically created a Deployment, which includes a Service and Ingress configuration to access our hosted app from outside the cluster.
Now let’s check the running services to corroborate that everything works as expected:
kubectl get services -o wide --all-namespaces

NAMESPACE            NAME              TYPE           CLUSTER-IP      EXTERNAL-IP
default              kubernetes        ClusterIP      10.43.0.1       <none>
kube-system          kube-dns          ClusterIP      10.43.0.10      <none>
kube-system          metrics-server    ClusterIP      10.43.33.97     <none>
kube-system          nginx-ingress     LoadBalancer   10.43.196.229   192.168.0.200
home-cloud-drawio    drawio            ClusterIP      10.43.35.88     <none>
We can access our application by visiting http://192.168.0.200 in our browser (avoid the SSL/TSL warning).
In this example we have not added any extra complexity (for learning purpose), but if a hosted app requires Storage, we will have to create Kubernetes Persistent Volumes too. Same with, for example Let’s Encrypt Certificates
Kubernetes: Useful Commands
kubectl is a very powerful CLI, it has great documentation and a very useful cheatsheet.
These are some of the most common commands I use:
# Cluster information
$ kubectl cluster-info
$ kubectl get nodes -o wide

# Check runnint Services
$ kubectl get services -o wide --all-namespaces

# Check running Ingress
$ kubectl get ingresses --all-namespaces

# Display all the running Pod
$ kubectl get pods -A -o wide

# Get logs for an specific Pod
$ kubectl logs -f <your_pod> -n <your_pod_namespace>

# Get information about an specific Pod
$ kubectl describe pod <your_pod> -n <your_pod_namespace>
Rules of (Over)-Complexity
Ok, so at this point in time…I LEARNED A LOT (and invested a lot of time too)…but I also HAD HEADACHES, and this is where the Rule of Seven applied:
In the end, I had a bunch of moving parts (with Kubernetes) which turned to be super complicated for what I really needed, plus I had a cluster with a lot of capacity that I was barely using (refer to the Monitoring Section for more on this).
That is why I decided to apply what I ALWAYS encourage in my daily work life:
- Reduce complexity by removing balls.
- Do not reinvent the wheel.
- YAGNI: You Aren’t Gonna Need It.
A simpler Docker Approach
Based on my previous points, then a pure Docker approach (with docker compose) was the way to go:
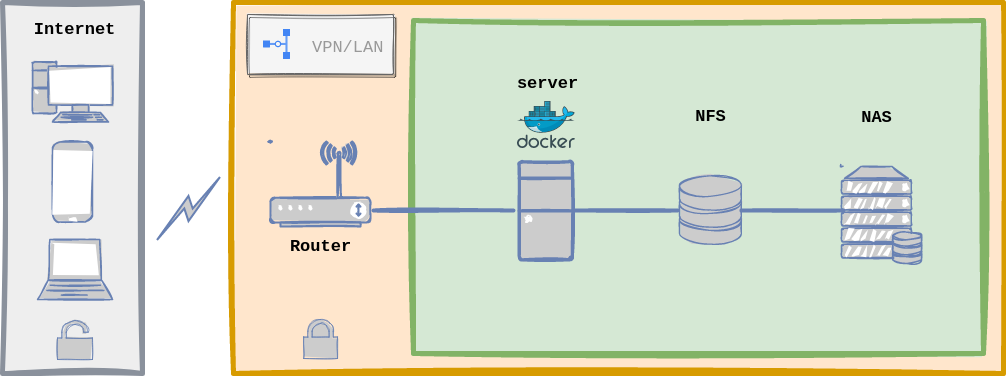 Home Lab General Architecture with Docker.
Upfront, this infrastructure architecture seems very similar to the one defined with Kubernetes, and indeed it is, the flow is the same as described above and server configuration is equal too. The biggest changeset has to do with implementation details:
- I only need one server (load distribution is off here).
- Handling configuration files with
dockeris easier. - Less moving parts, les complexity, for instance, less to maintain.
- I do not need a system for Microservices Orchestration.
As an example, we will setup the same application as above: draw.io with docker compose:
- We add this content to our docker compose file called
home-lab.yml:
version: "3.8"

services:

  traefik:
    image: traefik:latest
    container_name: traefik
    command:
      # Dynamic Configuration: mostly used for TSL certificates
      - --providers.file.filename=/etc/traefik/dynamic_conf.yml
      # Entrypoints configuration
      - --entrypoints.web-secure.address=:443
    labels:
      - traefik.http.routers.traefik_route.rule=Host(`traefik.home.lab`)
      - traefik.http.routers.traefik_route.tls=true
      - traefik.http.routers.traefik_route.service=traefik_service
      - traefik.http.services.traefik_service.loadbalancer.server.port=8080
    ports:
      - 80:80
      - 443:443
    volumes:
      - ~/traefik/dynamic_conf.yml:/etc/traefik/dynamic_conf.yml
      - ~/traefik/_wildcard.home.lab.pem:/etc/traefik/_wildcard.home.lab.pem
      - ~/traefik/_wildcard.home.lab-key.pem:/etc/traefik/_wildcard.home.lab-key.pem
    networks:
      - home-lab-network
    restart: always

  drawio:
    image: jgraph/drawio:latest
    container_name: drawio
    labels:
      - traefik.http.routers.drawio_route.rule=Host(`drawio.home.lab`)
      - traefik.http.routers.drawio_route.tls=true
      - traefik.http.routers.drawio_route.service=drawio_service
      - traefik.http.services.drawio_service.loadbalancer.server.port=8080
    networks:
      - home-lab-network
    restart: always
Let’s understand first what is going on within this file:
- We define 2 services: traefik and drawio.
- Traefik is our reverse proxy:
- Acts as our home lab entry point and forward requests to app containers.
- Manages SSL/TSL Certificates: I use self-signed certificates with
mkcertfor my custom domain:home.lab.
- Traefik SSL/TLS configuration uses the
dynamic_conf.ymldefined in our dockerhome-lab.ymlfile, volumes section, which looks like this:
tls:
  certificates:
    - certFile: /etc/traefik/_wildcard.home.lab.pem
      keyFile: /etc/traefik/_wildcard.home.lab-key.pem
      stores:
        - default

  stores:
    default:
      defaultCertificate:
        certFile: /etc/traefik/_wildcard.home.lab.pem
        keyFile: /etc/traefik/_wildcard.home.lab-key.pem
- As a next step, we execute the following command to run our containers:
$ docker compose -f home-lab.yml
- BOOM!!! Working!!! Let’s double check:
$ docker ps -a

CONTAINER ID   IMAGE           STATUS       PORTS                    NAMES
de20745cda65   traefik:latest  Up 5 hours   0.0.0.0:80->80/tcp       traefik
as24545tda76   drawio:latest   Up 5 hours   0.0.0.0:8080->8080/tcp   drawio
To access our hosted app, let’s just open a browser and go to https://drawio.home.lab.
Useful Docker Commands
First, it is mandatory to check the official documentation and the docker CLI cheatsheet.
# Running containers
$ docker ps -a
$ docker container ls -a

# Container management/handling
$ docker container stop <container_name>
$ docker container restart <container_name>
$ docker container rm <container_name>

# Image management/handling
$ docker images
$ docker image rm <image_id>

# Existent Volumes
$ docker volume ls
Monitoring
We can use 4 main services for Alerting and Monitoring:
- Prometheus: an open-source systems monitoring and alerting toolkit originally built at SoundCloud.
- Grafana: allows us to query, visualize, alert on and understand metrics.
- cAdvisor: provides an understanding of the resource usage and performance characteristics of running containers.
- Portainer: is one of the most popular container management platform nowadays.
Useful official setup guides:
- Prometheus: Monitoring Docker container metrics using cAdvisor
- Prometheus: Installing and Setting up Grafana
- Grafana: Dashboards Official Documentation
- Grafana: Alerting Official Documentation
- Portainer: Install with Docker on Linux
Here a screenshot of my Home Lab Monitoring/Alerting via the mentioned services/tools, where Prometheus scraps cAdvisor performance data and it is display on a Grafana dashboard:
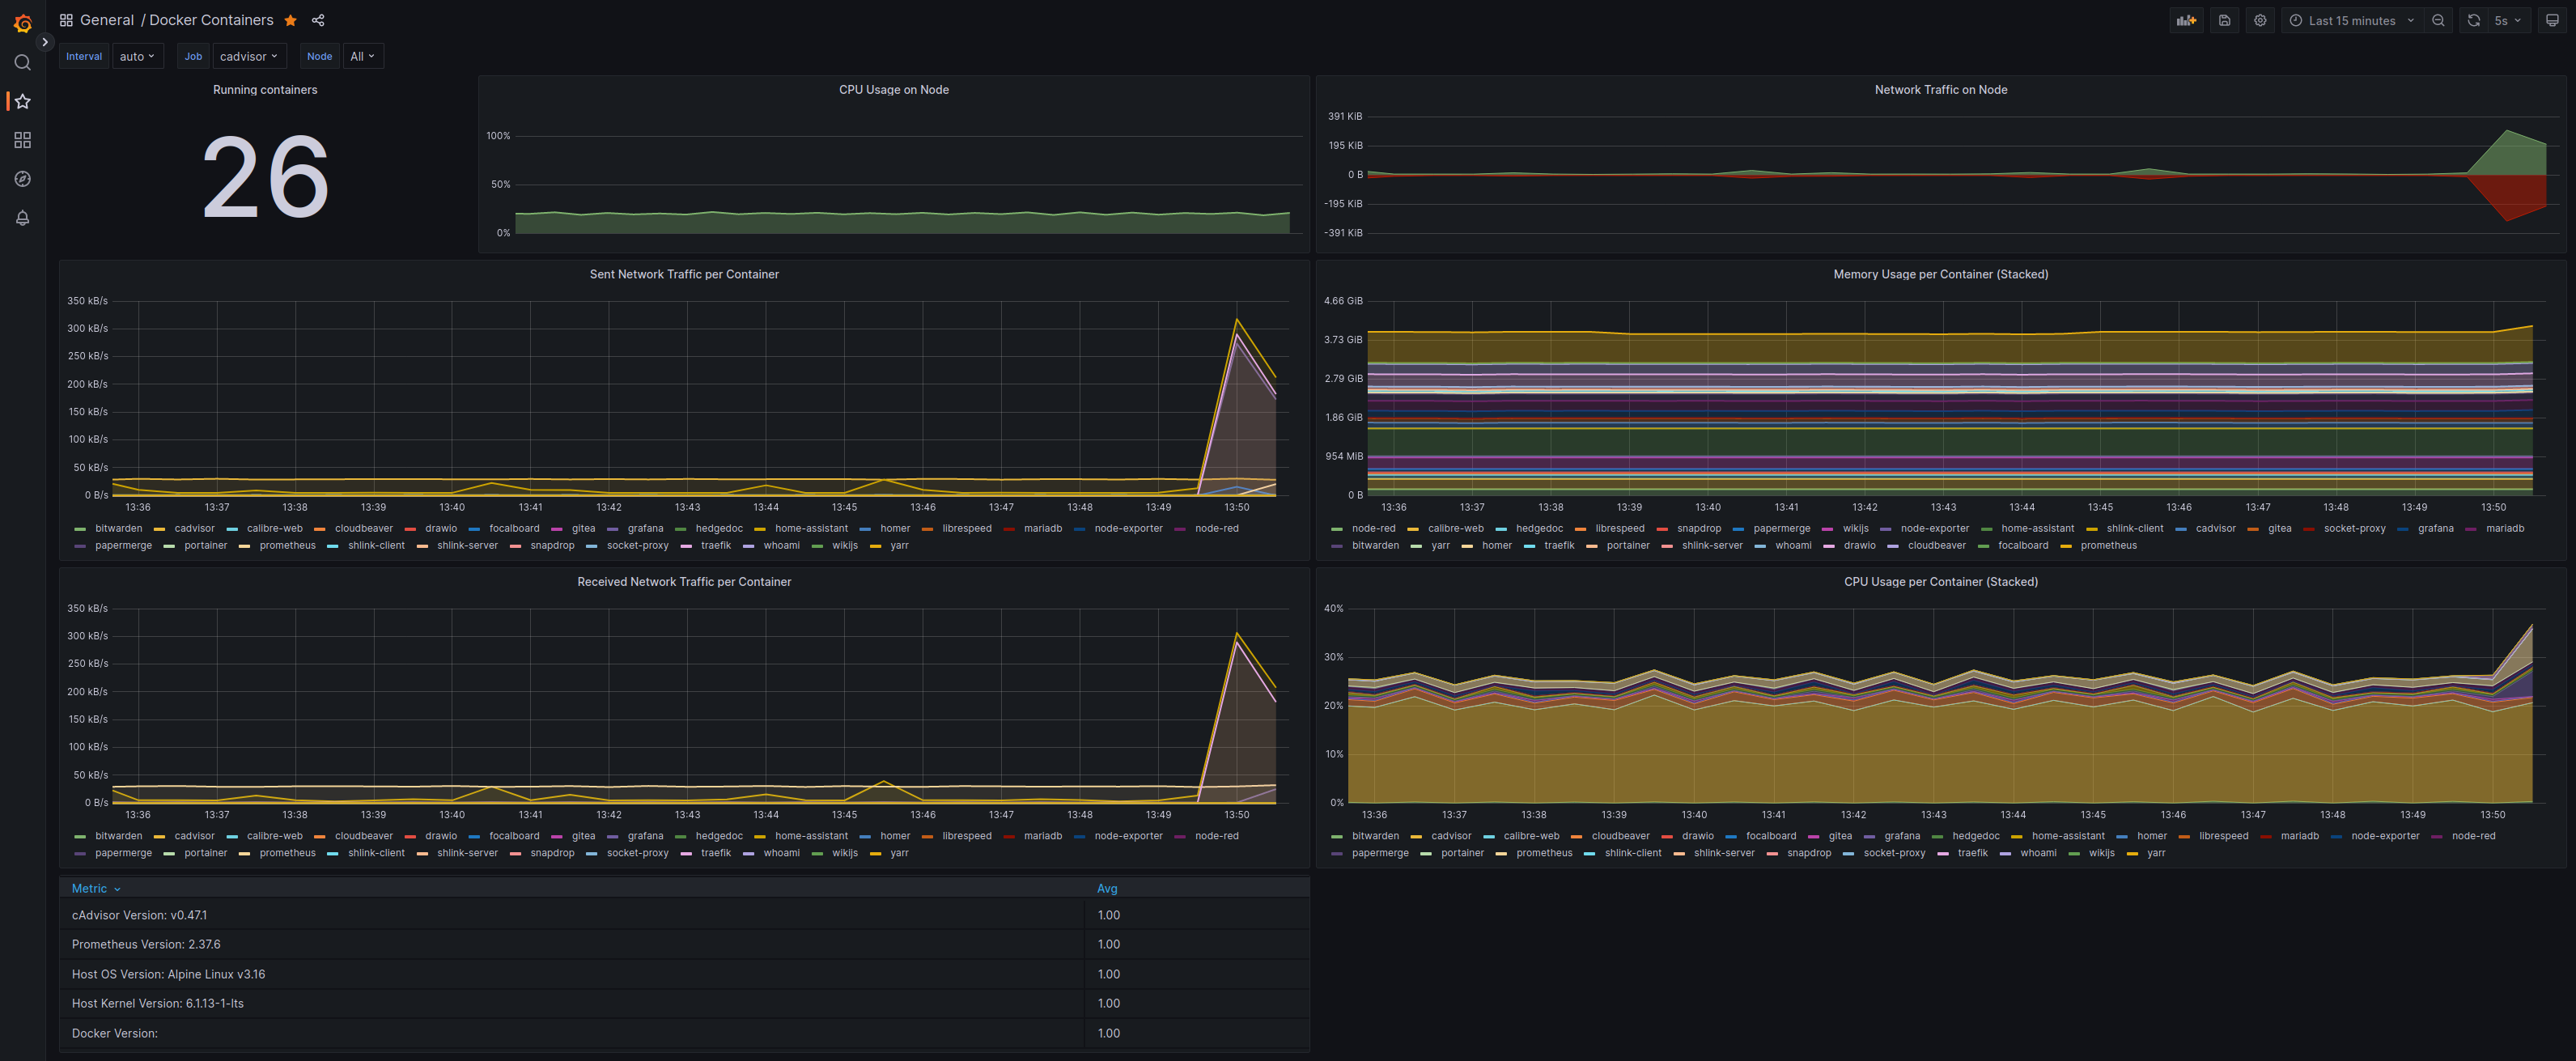 Grafana - Prometheus - cAdvisor combo for Alerting and Monitoring.
Extra ball: We can use ctop locally in our Linux Server:
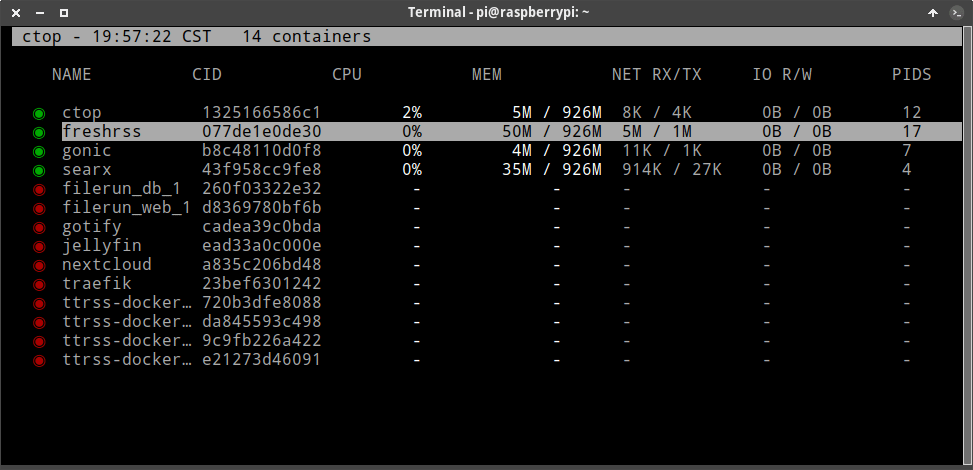
ctop provides a concise overview of real-time metrics for multiple containers.
Security
There is ‘NO 100%’ secure system, but we can always reduce risk. Personally:
- I do not expose my NAS or Services to the Internet.
- I only have a random port open in my router for my Wireguard VPN access.
- Server and NAS are both encrypted.
- I apply the latest security updates/patches (OS, Services and Infrastructure).
Alternatives to a VPN?
So far, I have mentioned that probably the safest way to access our Home Lab is to setup a Wireguard VPN, but there are a couple of alternatives to still setup our Home Lab for external access:
- Cloudflare Tunnel: an encrypted tunnel between our origin web server and Cloudflare’s nearest data center, all without opening any public inbound ports.
- Tailscale: in the end a bit of a Zero-Config VPN.
Fault Tolerance and Resilience
Fault Tolerance simply means a system’s ability to continue operating uninterrupted despite the failure of one or more of its components.
A system is resilient if it continues to carry out its mission in the face of adversity.
Revisiting these concepts trigger a couple of questions we need to answer…
How can we make sure our Home Lab is highly available?
No silver bullets here, and I also gotta say that in this space our approach with Kubernetes clearly wins, especially due to the capacity of having multiple worker nodes (high availability by nature), thus if one of them fails, the other could continue operating and take the load of the down one. The downside is whether our Kubernetes control plane fails, then we are in the same situation as with our single Server approach with docker (check docker swarm for high availability).
In case of failure with our simpler docker approach, we have an ADVANTAGE too: it is relatively easy to re-run the entire infrastructure, which means only ONE COMMAND. And as this happened to me (so far once and fingers crossed), I just grabbed a backup of my data and configured everything in NO TIME on my local computer until I figured out the issue.
How can we keep our data/information safe?
Data redundancy occurs when the same piece of data is stored in two or more separate places.
My approach for DATA REDUNDACY includes 2 practices:
- I use btrfs as file system with RAID 5 (4 hard drives) for data redundacy in case of a hardware failure.
- 3-2-1 Backup Strategy.
Server Administration
Assuming that our Server/NAS hard drives are encrypted and need to be decrypted remotely when restarting our Linux Server, we have a couple of options:
- Start an SSH Service in our Server Initial RAM Disk (FREE).
- Use a KVM Switch (MOSTLY EXPENSIVE).
- Open and inexpensive DIY IP-KVM on Raspberry Pi (CHEAP).
Maintenance
- Update your system periodically.
- Use the LTS Kernel for stability.
- Update your docker images and infrastructure tools.
- Backup your data.
- Upgrade your Hardware Firmware: Routers, Switches, Hubs.
The final Result
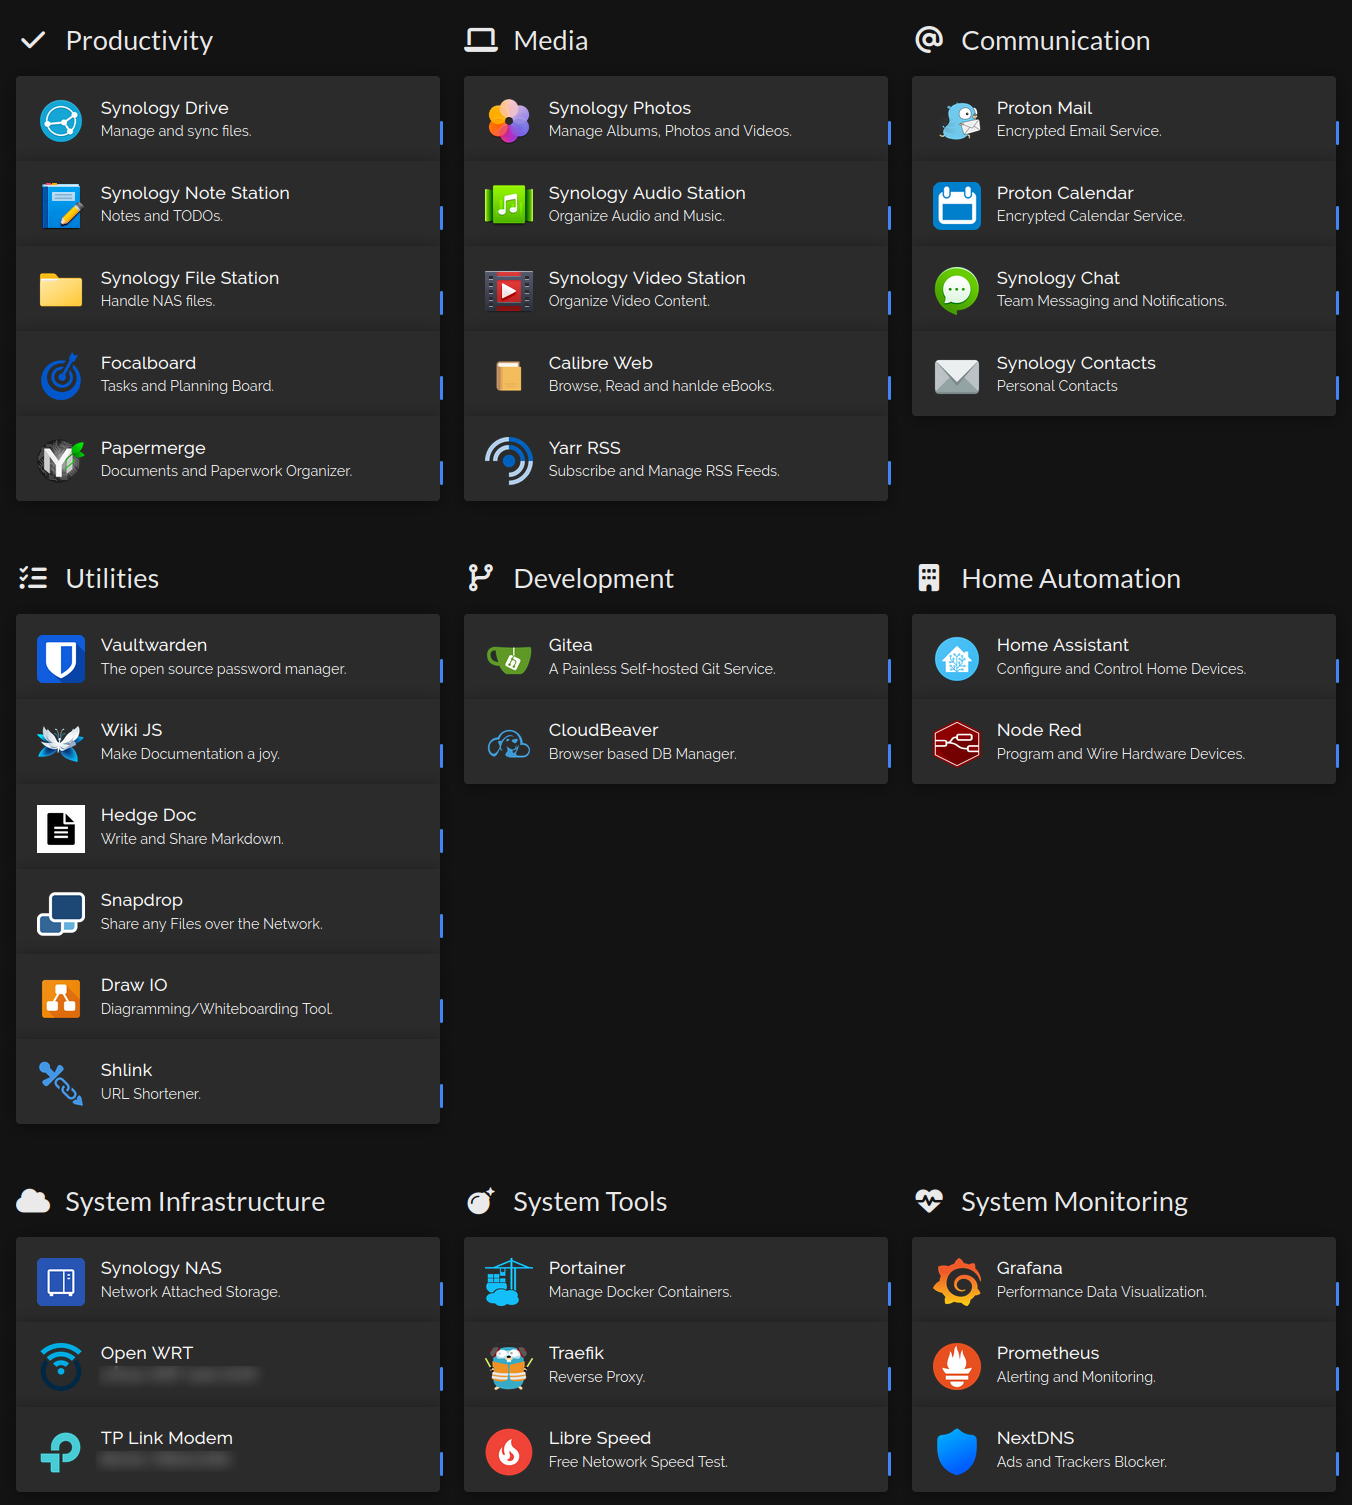 My Home Lab Dashboard using Homer.
Tips and Tricks
- Always document: a WIKI is our friend:
- Have a troubleshooting section.
- Runbook approach.
- Automate ALL the things.
Alternatives
If you reachead this point of the article and you are not convinced of using one or the other, then here I have a couple more alternatives to explore:
- Proxmox: is an open-source virtualization platform.
- Docker Swarm: is for natively managing a cluster of Docker Engines called a swarm.
Other Infrastructure tooling
I would not finish this article without mentioning some of the biggest players in IT-Infrastructure:
- Terraform: it enables infrastructure automation for provisioning, compliance, and management of any cloud, datacenter, and service.
- Ansible: is the simplest solution for automating routine IT tasks.
- Packer: used for creating identical machine images for multiple platforms from a single source configuration.
Conclusion
Well, after many months or hard work, I’m finally writing this conclusion: It has been (and still is) a long journey, which let me dive into this amazing world of Infrastructure, full of challenges but also with tons of lessons learned. I can only say that this post aims to be a time saver for you, and a source of knowledge share and struggles.
As ALWAYS, any feedback is more than welcome! See you soon :).